 |


Create a release template. 2.In the opened window select the release path previously created and select the Build Definitionto this release template to have acces to the build.
|
|
|
|
Create a release template
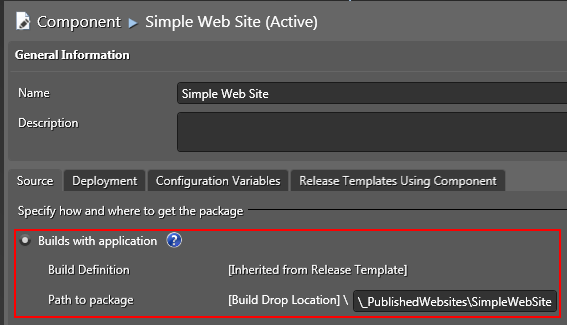
First we must create a component of the release template which shows the location of the build.
1. In the Configure Apps tab, in the Components compartment click New.
2. In Build Drop Location from the Builds with application, specify the location of the build which will be deployed.
3. In the Deployment tab, select the XCopy Deployer tool and click Save and Close.
Now we going to create a release template.
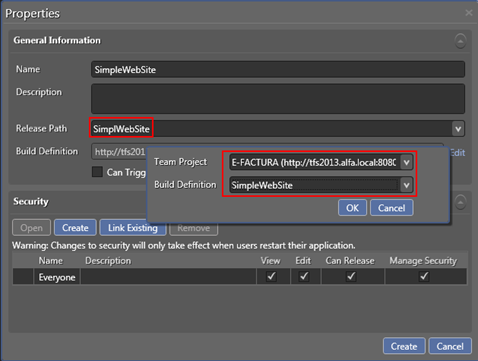
1. In the Configure Apps tab, in the Release Paths click New button.
2. In the opened window select the release path previously created and select the Build Definitionto this release template to have acces to the build.
Next you must define the sequence of actions that deploys your app for each stage.
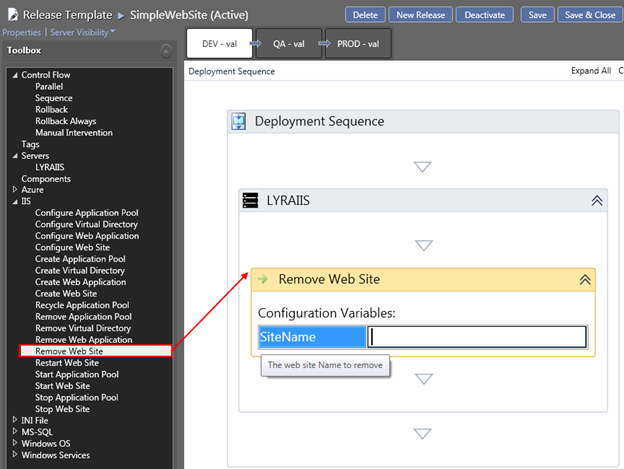
3. From Toolbox which is located on the left side, in the Servers category drag and drop the name of the server to the Deployment Sequence.

4. From the IIS category drag and drop Remove Web Site into the server previously added and add the name of the web site that will removed before being deployed a new build.
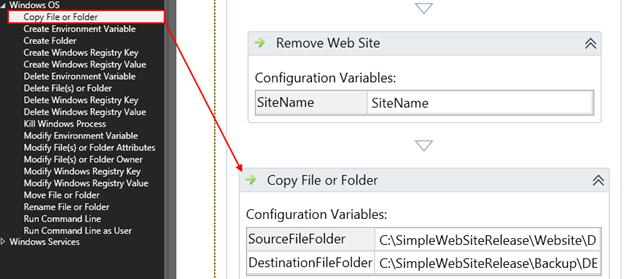
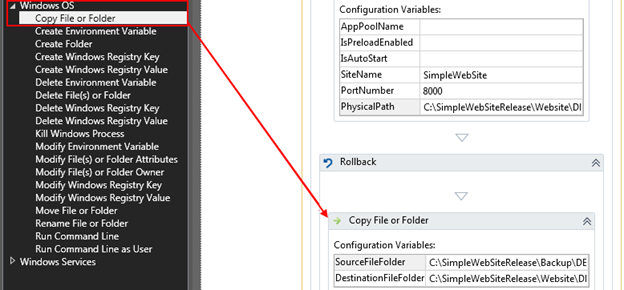
5. From the Windows OS category drag and drop Copy File or Folder into the server. In the SourceFileFolder add the path from where the source will be copied and into the DestinationFileFolder where the copy will be moved.
This sequence will backup the current build of the web site before the deployment of the new build.
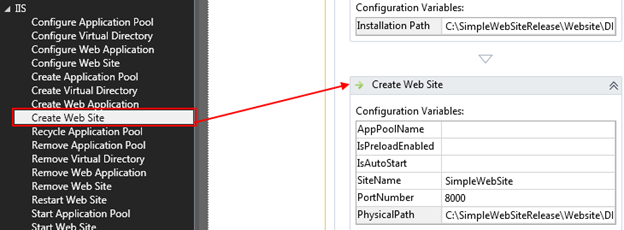
6. On the Components category click add and select the component which shows the drop build location. Drag and drop the component on the server and specify the site installation path.

7. From the IIS category drag and drop Create Web Site into the server.
Now we are going to add a rollback action as an error handling in case if something goes wrong.
8. From the Control Flow category drag and drop Rollback.
9. From the Windows OS category drag and drop Copy File or Folder to the Rollback action and specify the paths from which the backup will be restored to.
10. Copy and paste the Create Web Site tool from step 7 into Rollback action after the Copy File or Folder.
11. For other stages of the release template, repeat steps 3-10.
Queue a Release Build
1. Click Edit Build Definition created earlier and put the Release Build parameter to True. This will trigger the release workflow as soon as the build is completed.
2. Queue a New Build to the Build Definition.
3. Open the Release management and in the Releases tab click Traffic Overview.
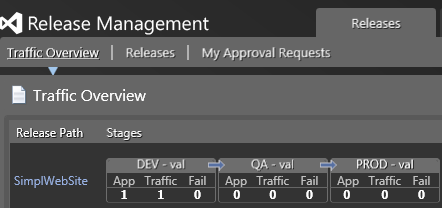
Here we can see that there is traffic in the Dev – val stage.
Double click Dev – val stage to view the release history of the stage and click Step Details to view stepts done to the current stage.

4. Go to My Approval Requests and approve build on the DEV – val stage.
|
|
|

5. Go to Traffic Overview and wait until the next stage will receive the build.
6. Repeat the approval step for every stage for which was added a Approver in the Release path.
Coded UI Test
Creating a new Coded UI Test Project
1. Open Visual Studio 2013.
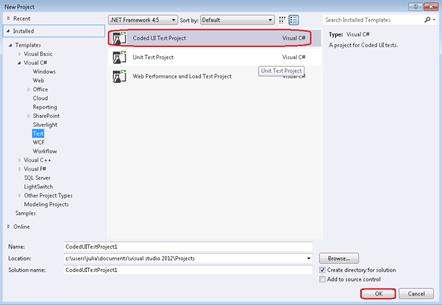
2. Create a new test project (File | New | Project... ).
3. In the New Project window, select the template Coded UI Test Project from the Visual C # | Test and click the button OK, to create a test project.
Data Driven Coded UI test
1. Create a new project. 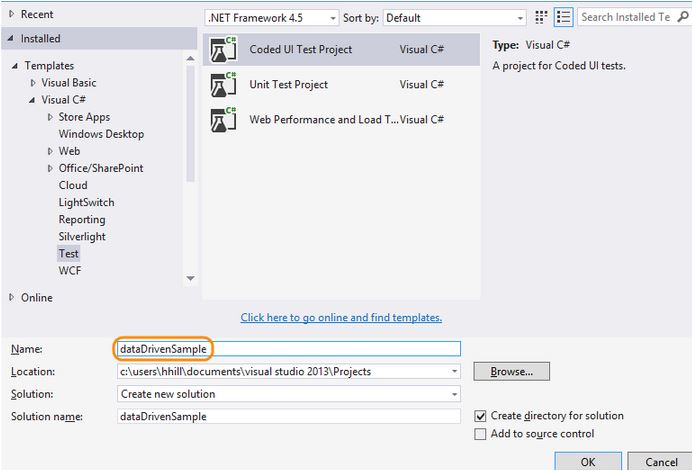
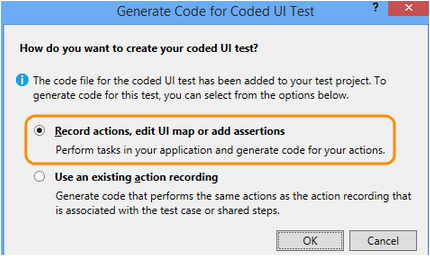
2. Choose to record the actions.
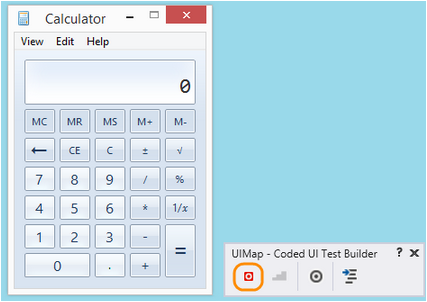
3. Open the calculator app and start recording the test.
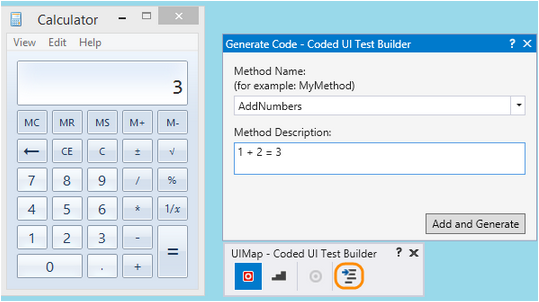
4. Add 1 plus 2, pause the recorder, and generate the test method. Later we’ll replace the values of this user input with values from a data file.
Close the test builder. The method is added to the test:
5. Use the Add Numbers() method to verify that the test runs. Place the cursor in the test method shown above, open the context menu, and choose Run Tests.
The test result that shows if the test passed or failed is displayed in the Test Explorer window. To open the Test Explorer window, from the TEST menu, choose Windows and then choose Test Explorer.
6. Because a data source can also be used for assertion parameter values—which are used by the test to verify expected values—let’s add an assertion to validate that the sum of the two numbers is correct. Place the cursor in the test method shown above, open the context menu and choose Generate Code for Coded UI Test, and then Use Coded UI Test Builder.
Map the text control in the calculator that displays the sum.
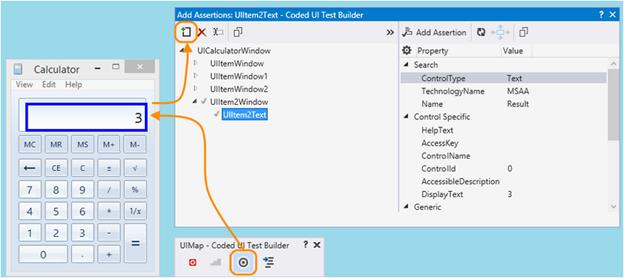
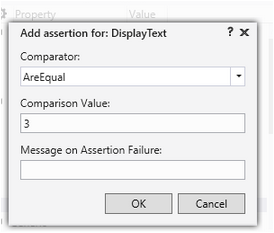
7. Add an assertion that validates that the value of the sum is correct. Choose the Display Text property that has the value of 3 and then choose Add Assertion. Use the Are Equal comparator and verify that the comparison value is 3.
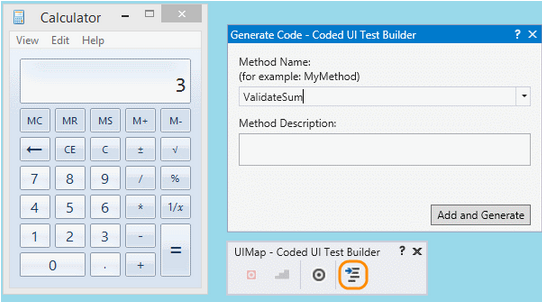
8. After configuring the assertion, generate code from the builder again. This creates a new method for the validation.
|
|
|
