 |
Technique of the Lower Segment Operation
|
|
|
|
1. The abdominal incision should be of sufficient length to allow for delivery and may be vertical or transverse.
a. The vertical incisions are fast and can be extended above the umbilicus if more room is needed. Less dead space is present in the wound, which decreases the risk of infection. The resulting wound, however, is weaker than that from a transverse incision. The skin and subcutaneous tissue are dissected sharply down to the fascia. The fascia can be incised vertically with a knife, or a window can be created and then the incision is extended with Mayo scissors. The rectus and pyramidalis muscles are then separated at the midline, which exposes the peritoneum. The peritoneum can be entered bluntly or tented between two instruments and entered sharply, after transillumination demonstrates no underlying bowel or omentum. The peritoneal incision is extended superiorly and inferiorly, with care taken to avoid the bladder and bowel. A parietal peritoneum may be dissected in transverse direction.
b. A sufficient transverse or Pfannenstiel incision is made approximately 2 finger breadths above the pubic symphysis. The tissue is divided sharply down to the fascia, which is transversely incised in a curvilinear fashion, either with the scalpel or with scissors. The superior and then the inferior edge of the fascia is grasped and elevated, and the fascia is either bluntly or sharply separated from the underlying rectus muscles. Dissection is continued superiorly to the level of the umbilicus and inferiorly to the pubic symphysis. The peritoneum is entered in the manner described earlier. A parietal peritoneum may be dissected in a transverse or longitudional direction.
2. Bladder flap. The uterovesical fold is grasped, elevated, and sharply incised above the upper border of the bladder in the midline (about 1. 5 cm above the apex of the bladder). Then the fold should be opened in each direction to undermine the serosa before sharply incising it. The bladder and lower portion of the peritoneum are then bluntly dissected off the lower uterine segment, and the lower segment is exposed. Then a bladder blade may be replaced between the bladder and the lower uterine segment (Fig. 220 C, D).
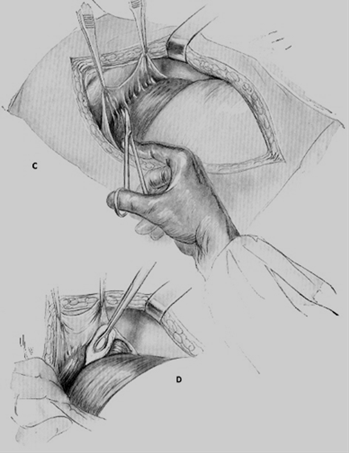
Fig. 220. Cesarean section. The bladder is exposed (C)
and lower uterine segment is exposed (D).
3. The transverse incision is used most commonly. A curvilinear incision is made transversely in the lower uterine segment at least 1–2 cm above the upper margin of the bladder (Fig. 220 E). The uterine cavity is entered carefully in the midline, with care taken to avoid injury to the fetus. The length of this insicion is 2 cm only. Then this incision should be extended bilaterally with two fingers to the sides and upward (Fig 220 F), with care taken to avoid the uterine vessels laterally. This type of incision is associated with less blood loss, fewer extensions into the bladder, decreased time of repair, and lower risk of rupture with subsequent pregnancies than other types of incisions. Disadvantages are the limitation in length and greater risk of extension into the uterine vessels.
|
|
|
The advantage of the low vertical incision is that it can be extended if more room is needed; in so doing, however, the upper segment of the uterus may be entered. Such an occurrence should be recorded in the operative notes, and the patient should be informed and counseled that vaginal birth trial is contraindicated thenceforth, as the risk of uterine rupture is as high as 9%. Low vertical incisions are associated with extensions into the active segment more frequently than transverse incisions. In addition, to avoid injury, the bladder must be dissected further for low vertical incisions than for transverse incisions.
The classical type of incision extends from 1 to 2 cm above the bladder vertically up into the upper segment of the uterus. Classical incisions are associated with more bleeding, longer repair time, greater risk of uterine rupture with subsequent pregnancy (4–9%), and greater incidence of adhesion of bowel or omentum. In cases of fetal prematurity, lower uterine segment fibroids, malpresentations, or fetal anomalies, however, it may be necessary to make this type of incision to provide adequate room for delivery.
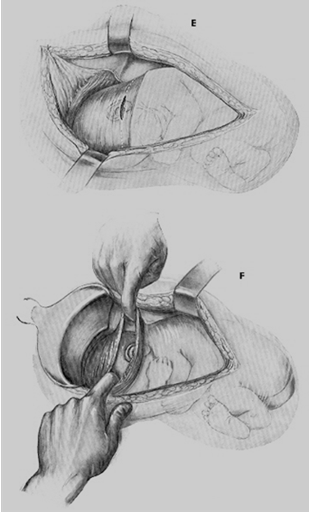
Fig. 220. Cesarean section: E - dissection of the uterine wall; F - the incision is extended laterally and upward; . M, N –the head is elevated through the incision.
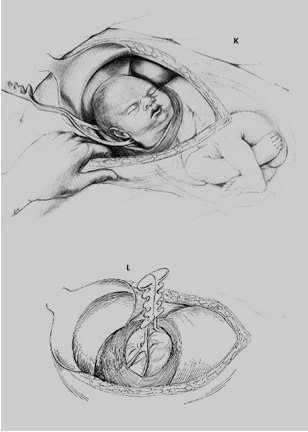
The head is elevated through the incision. The remainder of the fetus is delivered using gentle traction on the head as well as fundal pressure. The child is extracted either by the leg, if the breech presents or by grasping the head with one hand (Fig. 220 M, N). Shoulders and trunk should be removed after it (Fig. 220 O, P). If it is indicated the infant may be delivered with the forceps, or vacuum extraction (more rarely). (Fig. 220 K, L). The infant's nose and mouth are suctioned, the umbilical cord clamped and cut between two forceps (Fig. 221), and the infant is delivered to the resuscitation team. The placenta is removed manually (Fig. 222).
After the delivery of placenta, oxytocin is administered. The uterus may be removed through the abdominal incision or left in its anatomic position. The incision is inspected for extensions, and the angles and points of bleeding are clamped with fenestrated clamps. The uterine cavity is wiped with a laparotomy pad to remove the retained membranes or placental fragments; some surgeons prefer to perform the curettage of the uterine cavity to prevent remaining of placental and membrane tissue in the uterus.
Repair begins laterally to the angle of incision, with care taken to avoid the uterine vessels. A running or running locking stitch is placed. The entire myometrium should be included. The second imbricated stitch, either horizontal or vertical, may then be placed if hemostasis is not obtained with the initial suture. The edges of the divided uterovesical fold of the peritoneum are then united with a continuous catgut suture (Fig. 223).
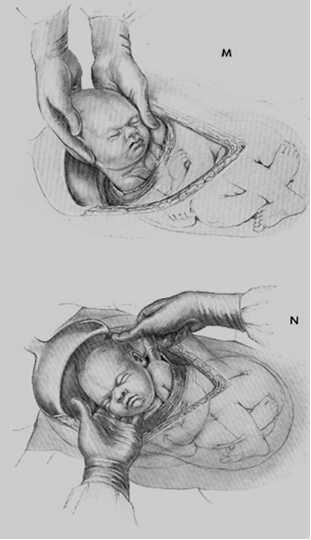
Fig. 220. Cesarean section: M, N –the head is elevated through the incision.
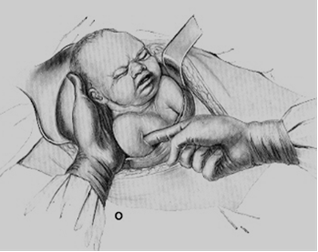

Fig. 220. Cesarean section: O - removing of shoulders; P - removing of trank
|
|
|
Fig. 220. Cesarean section: removing of the head by forceps.
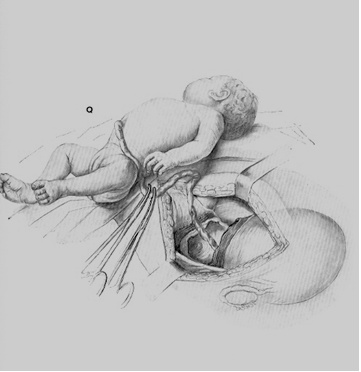
Fig. 221. Cutting of the umbilical cord between two clamps.

Fig. 222. Removing of the placenta
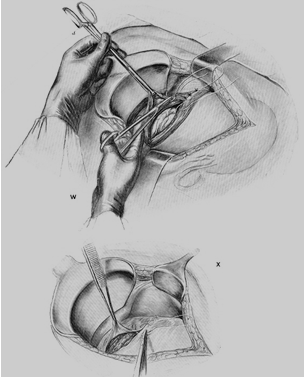
Fig. 223. Repairing of the uterine wound.
The incision is inspected, and further areas of bleeding may be controlled with figure-of-eight sutures or electrocautery.
In classical cesarean sections, two or three layers of sutures may be required to close the myometrium. The serosa should then be closed with an inverting baseball stitch to decrease formation of adhesions of bowel and omentum to the uterine incision.
Abdominal closure. The tubes and ovaries are inspected. The posterior cul-de-sac and gutters are cleaned of blood and debris. The uterus is returned to the anatomic position in the abdominal cavity and the incision reinspected to assure hemostasis with the tension off the vessels. The fascia is then closed with running delayed-absorption sutures. The subcutaneous tissue is inspected for hemostasis, and dead space may be closed with interrupted absorbable sutures. The skin is closed with subcuticular stitches or staples.
OBSTETRIC FORCEPS
It is an instrument designed for extraction of the head of the child. Obstetric forceps are used to apply traction to the head of a viable fetus. The main purpose of this operation is extraction of the fetus by the head.
The Fenomenov modification of the Simpson forceps is now commonly used (Fig. 224). The forceps consist of 2 branches crossing in their middle point. Each branch comprises the following three parts:
· fenestrated blade, or spoon, by which the head is grasped;
· a lock by which the forceps branches are immobilized;
· the handles provided with prominences (the so-called Busch’s hooks) which facilitate the grasp of the surgeon’s hands on the forceps during extraction.
The forceps have two curves, namely the cephalic and the pelvic curve. The cephalic curve is in the apposition to the curvature of the fetal head, while the pelvic curve coincides with the curvature of the pelvic axis.
The length of the forceps is about 35 cm. The handles are a heavier part of the forceps; the length of the handles is about 15 cm. The length of the blades is about 20 cm. The diameter of the cephalic curve between two blades is 11 cm, the distance between the horizontal plane and the apex of the blade of the forceps is 2. 5 cm.
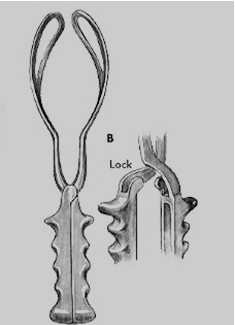
Fig. 224. The Fenomenov modification of the Simpson forceps
The forceps may be used for:
· urgent termination of labor for the sake of the maternal and fetal safety;
· substitution of maternal bearing down efforts with extractive efforts of the surgeon.
The operation may be performed according to plan, or it may be urgent.
Indications are as follows:
· Secondary inertia (weak pains) without any effect of medicamental treatment;
· Fetal distress (hypoxia, asphyxia) without any effect of treatment;
· Endometritis of labor.
· Hemorrhages in the 2nd stage of labor.
· Severe forms of preeclampsia, eclampsia.
· Severe forms of extragenital diseases with decompensation (grave diseases of cardiovascular system and lungs, grave myopia (more than 8 diopters), bronchial asthma, etc. )
Application of forceps should be made under special conditions. Thus, requisite conditions are:
· Full dilation of the cervix.
· Ruptured fetal membrane.
· The fetal head is of normal size (neither small as in a premature fetus, nor large as in a giant fetus or in a hydrocephalus).
· Normal pelvic architecture (normal pelvic sizes).
· The head is in the pelvic cavity or at its outlet.
· Viable fetus.
Types of Forceps Operations
The operations are classified according to the station of the fetal head at which the forceps are applied.
· High forceps delivery. The head lies free above the plane of the inlet and can barely be reached (freely moveable or floating head). The head may be entering the pelvis, but its lowest portion has not descended to the level of the ischial spines. Whatever the case is, the head is unengaged because its biparietal diameter has not passed the plane of the pelvic inlet (Fig 225). If that's the case the operation is named “inlet forceps” operation (or operation with a freely moveable (floating) head above the brim). This type of forceps operation is not useful nowadays.
|
|
|
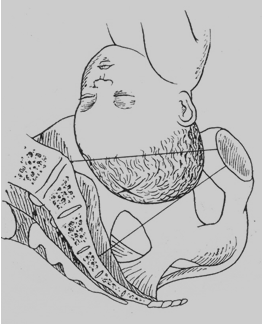
Fig. 225. Area of inlet forceps (non-useful)
· High midforceps deliveries - the biparietal diameter of the head has passed through the inlet, and lies at the level of 2nd plane of pelvis, but remains above the level of ischial spines. The lowest portion of the head (denominator) lies between the level of the ischial spines and perineal floor. The occiput has begun to rotate toward the anterior quadrant of the pelvis (Fig. 226). This type of forceps delivery is named atypical forceps; it is very difficult to perform. It is practically never performed nowadays.
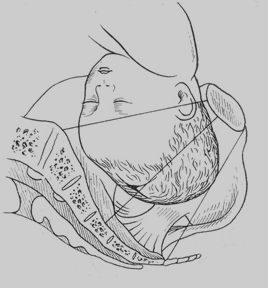
Fig. 226. Area of high- mid forceps. The head is on the 2 plane of pelvis
· Low midfporceps delivery – biparietal diameter has passed the 2nd plane of the pelvis and lies at a level of ischial spines. The sagittal suture may lie in one of the oblique diameter or in the anteroposterior diameter of this plane of the pelvis (Fig. 227). This type of forceps delivery is named typical forceps; it is mostly an elective operation with the aim of substitution of expulsive pain caused by maternal diseases and complications.
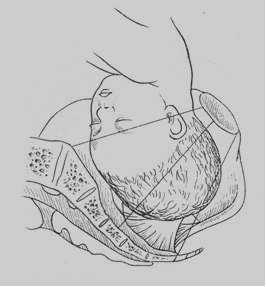
Fig. 227. Area of low-mid forceps. Biparietal diameter lies at the level of ischial spines
· Outlet forceps delivery – it is a variety of low forceps operation when the forceps are applied to the fetal head lying on the pelvic floor and is visible at the introitus in between contractions. The sagittal suture should lie in anteroposterior diameter of the outlet. The best conditions for application of forceps are when the head is descended to the pelvic outlet (Fig. 228).
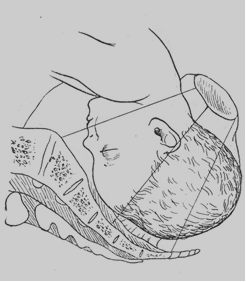
Fig. 228. Area of outlet forceps. The fetal head lies on the pelvic floor.
Application of Outlet Forceps
Forceps, wide specula, bullet forceps (for inspection of the cervix after operation), scissors for perineotomy and instruments required for suturing the perineum should be prepared before the operation. Forceps delivery is often accompanied by perineal lacerations, which should be repaired. So perineotomy should be applied before the extraction of the head to prevent perineal laceration. Perineotomy is sometimes needed before application of forceps.
General anesthesia should be done just before the operation.
The bladder should be catheterized to be empty before the operation.
Before the operation the woman is given a vaginal examination in order to establish the position of the head in the pelvis, the direction of the sagittal suture, and the position of the fontanelles. In anterior occiput presentation the head appears at the pelvic outlet with the sagittal suture in the anteroposterior diameter, the posterior fontanelle being at the symphysis and the anterior fontanelle (large fontanelle) directed toward the sacrum.
The operation may be divided into the following steps:
· insertion of the forceps blades;
· locking the forceps;
· trial traction;
· traction proper (extraction of the head);
· removal of the forceps.
The forceps blades are inserted in the following way: the left blade is inserted by the left hand of the surgeon into the left part of the maternal pelvis. After the insertion and application of the left blade, the right blade will be inserted too (Fig. 229). The left blade is inserted first, and the right one - second. Thus the first rule of application is the rule of “three lefts”.
|
|
|
The right blade is inserted by the right hand into the right half of the pelvis (Fig. 230). If the head is in the pelvic outlet plane, the blades are inserted in the transverse diameter of the pelvis.
The blades are applied along the sides of the head grasping the biparietal diameter in between the widest parts of the blades.
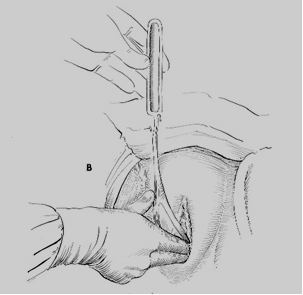
Fig. 229. Application of outlet forceps: insertion of the left blade.
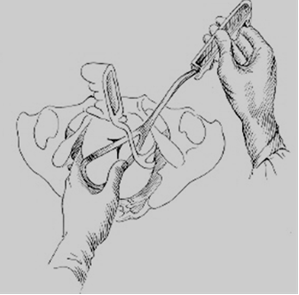
Fig. 230. Application of outlet forceps: insertion of the right blade.
The long axis of the blades corresponds more or less to the occipitomental diameter of the fetal head. The forceps are applied to the parietal tuberosities and ears of the fetal head, with the posterior fontanelle (the denominator, or leading point) being in the plane of the forceps: the pelvic curve of the forceps corresponds to the curve of the birth canal. It is the ideal application of forceps (Fig. 231). Perineotomy is performed at this time.
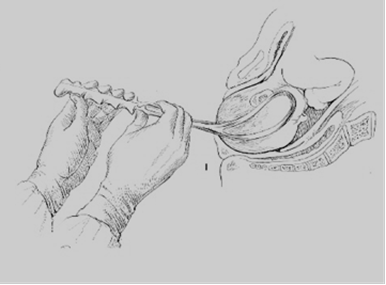
Fig. 231. The forceps are applied to the parietal tuberosities, and ears of the fetal head with the denominator are in the plane of the forceps: the pelvic curve of the forceps corresponds to the curve of the birth canal
Insertion of the forceps blades. Four fingers of the right hand are introduced into the vagina and rested on the lateral surface of the head (the finger tips are directed towards the fetal chin). The left part of the forceps is grasped by the left hand like a fiddle or a pen, and brought to the right groin of the parturient (parallel to the flexure). The left blade is inserted into the vagina between the right hand and the fetal head, the inferior margin of the blade sliding in the groove formed by the index and the third finger. The blade is steaded and guided by the thumb (Fig. 232). No excessive pressure should be applied to the forceps blade. The blade is introduced by simultaneously pressing the handle and swinging it toward the midline as the blade is pushed over two fingers of the operator’s right hand into the vagina.
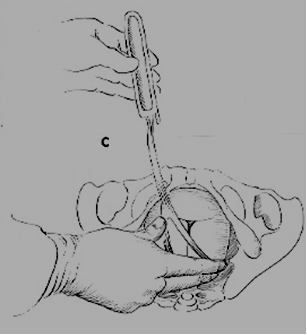
Fig. 232. Insertion of the forceps blade: the blade is steadied and guided by the thumb
The internal hand guides the blade toward the parietal tuberosity of the head. The right hand is then removed from the vagina, and the handle is now held by the assistant.
The right blade is inserted in the same manner, the guidance and control being affected by the left hand. The handle of the right branch always overlies the left one.
Locking the forceps. Each handle is grasped by the corresponding hand. The branches are brought together and locked. The correctly applied forceps locks easily.
Trial traction (Fig. 233). When the forceps is locked, a trial traction should be attempted to see that the blades do not slip. To that end, the handles are grasped by the right hand and the left hand is placed over the right one with the index finger touching the fetal head. Traction is now applied. If the forceps is applied correctly, the head will move together with the forceps and the index finger remains in contact with the head. If the forceps slips (incorrectly applied forceps) a gap forms between the finger and the head (the forceps is extracted from the vagina, while the head remains in its initial position).
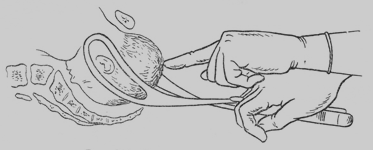
Fig. 233. Trial traction
Traction proper. This is the extraction of the fetal head. In primigravida the pull required is estimated to be about 18 kg and in multiparae - about 13 kg.
The right hand grasps the lock of the forceps (two fingers resting over the Busch’s hooks) and the left hand takes hold of the handle. These movements of the mechanism of labor that have not been completed spontaneously should be performed artificially during traction. Traction should be gradual and simulate the natural progress of the fetus through the birth canal (each traction continuing for 60-90 seconds). One or two-minute intervals should be made between each traction, during which the pressure of the forceps on the fetal head should be slightly released to improve the cerebral circulation of the fetus. The direction of traction should correspond to the axis along which a spontaneously expelled head moves, i. e. along the pelvic axis.
|
|
|
If the head is at the pelvic outlet, traction should be horizontal until the occipital tuberosity has been freed and the posterior cranial fossa is brought to the pubic arch. The surgeon (operator) should assume his position at the left side of the parturient, grasp the handles with the right hand and pull the head upwards, the left hand being used to protect the perineum from possible lacerations. The vertex is extended by the upward traction and the head is thus delivered.
Removal of forceps. The forceps may be removed from the head after the occipital and parietal tuberosities have been freed.
Further delivery of the head may be assisted manually (as in spontaneous delivery). The head may also be delivered in forceps.
The forceps is removed in the reverse order: the right blade is removed first, the left - second. The handles of the forceps should be directed towards the opposite thigh of the woman.
Just after the delivery of the fetus a manual separation of the placenta and removing of afterbirth should be made to prevent hemorrhages, to diagnose rupture of the uterus, if any.
After removing of afterbirth, the cervix should be inspected with specula. Lacerations, if any, should be repaired.
|
|
|


