 |


5-2-1 how to feed in/take up media and set starting position.
|
|
|
|
5-2-1 how to feed in/take up media and set starting position.
Feeding In Media:

(1) Make the machine to return to the standby interface, if not on standby, press the menu button to exit all menus to return to the standby interface.

(2)  Hold button to bring the button forward, make it through the printing channel, press button to make the roller move automatically. Release the button to stop moving the media.
Taking up MediaЈє
(1)  Connect to make the machine to return to the standby interface, if not on standby, press the menu button to exit all menus to return to the standby interface

(2)  Hold button to bring the media backwardЈpress
  button that will not make the media Ў°windingЎ±Ј and have to WIND the media by hand. Release the Ў°buttonЎ± to stop moving the media.
How to set the starting positionЈє
(1) Use the LCD control panel to set the staring printing point.
 Connect to make the machine to return to the standby interface, if not on standby, press the menu button to exit all menus to return to the standby interface

 Hold the button to move the carriage to the start printing point,

then press the ORIGINAL POINT button.
(2)  Use the control software to set
the starting printing point.
Use the TAPE MEASURE to measure from the right side of platform to the left side.

Read out the number and fill it in the white blank at the edge of the toolbar of software. The unit is CM
5-2-2 How to check the print head according to Ў°test printing barЎ±
Print head test checks whether all the spray nozzles open, nozzles are in an optimal state. There are two ways to print the test bar:
(1) Using the LCD control panel to print.
After setting materials and print starting position and return to the standby interface, if not on standby, press the menu button to exit all menus to return to the standby interface.
 |
Press the Menu Button to enter the print head status interface.
 |
Then Press CONFIRM.
 (2) Use CONTROL SOFTWARE to print.
After setting the materials and printing staring positionЈclick the TEST BUTTON
on the toolbar and select the Print Head Status to carry out print head test printing.
Use the eyes to check if the picture missing some lines, or run diagonal lines. If not, start to print the file. If any of the above conditions occur, have to clean the print head and test it again.


5-2-3 How to auto-clean or manual-clean the print head
Automatic Cleaning
Four modes of automatic cleaning: strong, middle, weak and additional.
All these can be done by LCD control panel or software respectivelyЈє
|
|
|
(1)  On LCD control panel.

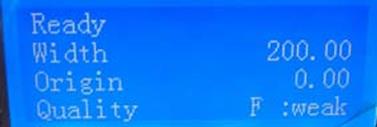
Under standby status, click the CLEAN BUTTON to begin cleaning.
Click once menu button will enter the cleaning menu as it is shown in above picture.
 Click the button, showing the mode of strong, middle, weak and additional, using

 or button to choose mode and then click the enter button.

(2) Software cleaning
On the blank of control software, click button, clean at the original set mode.
AdditionalЈє
After strong mode cleaning, still does not workЈthen you could use additional mode to clean the print head.

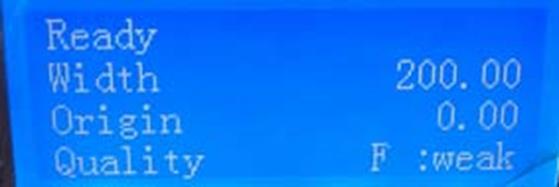 |
Return to the cleaning interface, if not cleaning interface, click the button to exit all the menus.
 Press Menu Button once to enter the cleaning menu, then press
  button to enter cleaning modeЈclick button to choose: strong, middle, weak and additional.
|
|
|
