 |


7-3-2 Guide Rail Oiled. 7-3-3 Mechanical Movement Wheels Oiled. 7-3-4 Carriage Bottom Surface Cleaning. 7-4-1 Change the Scraping Sheet
|
|
|
|
7-3-2 Guide Rail Oiled
See 7-2-6.
7-3-3 Mechanical Movement Wheels Oiled
See 7-2-7.
7-3-4 Carriage Bottom Surface Cleaning
 |
see 7-3-1.
Turn off the machine.
 Move the carriage to the left. Then clean the bottom with cotton swab.
7-4 Monthly Check and Maintenance
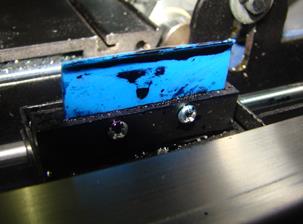 |
7-4-1 Change the Scraping Sheet

 Pull out the scraping sheet. Remove the screws (see picture). And clamp out the sheet.
7-4-2 Check the Coupling and Jackscrew
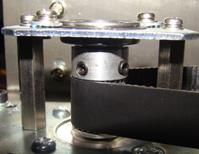 |
Check and tighten the jackscrew of X-axial and Y-axial synchronic wheel.
 | | ||||
 | |||||
 7-4-3 Clean the BodyЎЇs Internal Dust
You can use the blower gun to remove the inside dust, as the electrical partsЎЇ lifetime may be affected by the dust.
7-4-4 Organizing Computer/Antivirus
Clear the computer system regularly.
Make sure the capacity of the software disk is no less than 10 G.
7-5 Quarterly Check and Maintenance
7-5-1 cleaning the Ink Channels System
Install the special cleaning ink tank and inject cleaning liquid. See 4-4.
Connect the tubes. See 4-4.
 Start cleaning.


Repeat the steps above, until the ink tubes are clean.
7-5-2 Change the Ink Sac
Contact the local distributor.
7-5-3 Check the Infrared Heating
Contact the local distributor.
7-5-4 Check the Platform Heating
Contact the local distributor.
7-5-5 Check the Motor and Driver
Contact the local distributor.
7-6 Annually Check and Maintenance
7-6-1 Change the Head Protective Plate
Contact the local distributor.
7-6-2 Clean the Ink Channel and Ink Pump
Clean the ink system please see 7-5-1.
Chang the ink pump please contact the local distributor.
7-6-3 Check the Level of Guide Rail and Platform
Contact the local distributor.
7-6-4 Check the whole Machine and Loose Screws
Contact the local distributor.
7-7 Maintenance During Turning Off for a Long Period
7-7-1 Long period (2 days --1 week) turning off preparation
If you wanna shut the machine for more than 2 days, please proceed the steps below:
1, clean the scraping sheet. See 7-2-3.
2, clean the head protective plate. See 7-2-3.
3, maintain the print head.
Open the machine once 2 days and test the headЎЇs printing status. See 7-2-3. Then, turn off the machine and maintain the print heads. See 5-2-9.
7-7-2 Long period (1 week --4 weeks) turning off preparation
If you wanna shut the machine for more than 1 week, please proceed the steps below:
|
|
|
1, clean the scraping sheet. See 7-7-1.
2, clean the head protective plate. See 7-7-1.
3, maintain the print head. See 5-2-9.
7-7-3 Long period (above 4 weeks) turning off preparation
If you wanna shut the machine for more than 4 weeks, please proceed the steps below:
1, clean the scraping sheet. See 7-7-1.
2, clean the head protective plate. See 7-7-1.
3, clean the ink tube. See 7-5-1.
4, retain some cleaning liquid. See 7-5-1.
5, maintain the print head. See 5-2-9.
8 Frequently Asked Questions and Solutions.
8-1 Print troubles shooting
8-1-1 White lines in printed picture.
 |
There are white lines on the image--picture 1.
Reason:
The media has been fed in incorrectly or the setting of stepping volume is incorrect.
Solution:
1, feed in the media correctly, try to make it tight and straight. See paragraph 5-1-5.
2, calibrate the stepping volume. See paragraph 6-3-5.
3, change the stepping speed. See paragraph 6-3-2.


 |


 |
There are white lines on the image— picture 2.

Reason:
The head has broken line or jam.
Solution:
1. Make sure whether the head has been tested and cleared before printing. See paragraph 5-2-1 and 5-2-2.
2. Suspend printing and clean the head and test it. See paragraph 5-2-1 and 5-2-2.
3. Force to clean the head. See paragraph 5-2-2.
4. Clean the head protective plate. See paragraph 7-2-2.
5. Repeat step 2 and step 3.
6. For the information of replacing the jammed or broken head, see paragraph 8-3. And contact local distributor.

There are white lines on the image— picture 3.

Reason:
The ink and media are incompatible.
Solution:
1, Do the stepping calibration. See paragraph 6-4-5.
2, turn down the heating temperature and do the stepping calibration. See paragraph 5-1-10 and 6-4-5.
3, turn up the heating temperature and do the stepping calibration. See paragraph 5-1-10 and 6-4-5.
4, increase the PASS number. Chose printing model in RIP.
5, print under high ink density model. set the ink drop in RIP.
6, print on the media which you have got high quality image before.
|
|
|
