 |


To reset the oil change indicator light
|
|
|
|
1. Turn the key to “ON”.
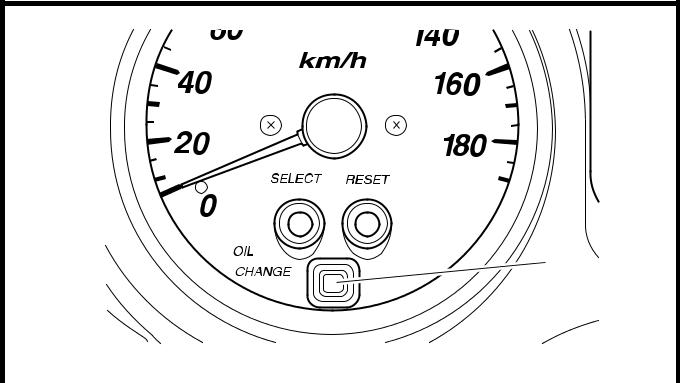
2. Hold the “OIL CHANGE” button 1 pushed for two to eight seconds.
3. Release the “OIL CHANGE” button 1, and the oil change indicator light will go off.
| NOTE: | |||
| If the engine oil is changed before the oil | |||
| change indicator light comes on (i.e. before the | |||
| periodic oil change interval has been reached), | |||
| the indicator light must be reset after the oil | |||
| change for the next periodic oil change to be | |||
| indicated at the correct time. To reset the oil | |||
| change indicator light before the periodic oil | |||
| change interval has been reached, follow the | |||
| above procedure, but note that the indicator | |||
| light will come on for 1.4 seconds after releas- | |||
| ing the “OIL CHANGE” button, otherwise | |||
| repeat the procedure. | |||
1 - 17
 GEN
GEN
FEATURES INFO
V-belt replacement indicator “V-BELT”
This indicator flashes every 20,000 km (12,000 mi) when the V-belt needs to be replaced. The electrical circuit of the indicator can be checked according to the following pro-cedure.
1. Turn the key to “ON” and make sure that the engine stop switch is set to “  ”.
”.
2. If the indicator does not come on, check the electrical circuit. Refer to “SIGNALING SYSTEM” in chapter 8.


To reset the V-belt replacement indicator
1. Turn the key to “ON” and make sure that the engine stop switch is set to “ON”.
2. Disconnect the V-belt replacement reset coupler 1 for two to ten seconds.
3. And then, connect the V-belt replacement reset coupler, the V-belt replacement indica-tor will come on for 1.4 seconds.
And the V-belt replacement indicator will go off.
NOTE:

If the V-belt is replaced before the V-belt replacement indicator comes on (i.e. before the V-belt replacement interval has been reached), the indicator must be reset after the V-belt replacement for the next periodic V-belt replacement to be indicated at the correct time.

Self-diagnosis device
Refer to “ANTI-LOCK BRAKE SYSTEM (XP500A)” in chapter 4 “FUEL INJECTION SYSTEM” in chapter 7 and “IMMOBILIZER SYSTEM” in chapter 8.
Clock mode
To set the clock:
1. Push the “SELECT” button and “RESET” button together for at least two seconds.
2. When the hour digits start flashing, push the “RESET” button to set the hours.
3. Push the “SELECT” button, and the minute digits will start flashing.
4. Push the “RESET” button to set the min-utes.
5. Push the “SELECT” button and then release it to start the clock.
|
|
|
1 - 18
GEN
IMPORTANT INFORMATION INFO
EAS00020
 IMPORTANT INFORMATION
PREPARATION FOR REMOVAL AND
DISASSEMBLY
1. Before removal and disassembly, remove all dirt, mud, dust and foreign material.
2. Use only the proper tools and cleaning equipment.
Refer to the “SPECIAL TOOLS”.
3. When disassembling, always keep mated parts together. This includes gears, cylin-ders, pistons and other parts that have been “mated” through normal wear. Mated parts must always be reused or replaced as an assembly.
4. During disassembly, clean all of the parts and place them in trays in the order of dis-assembly. This will speed up assembly and allow for the correct installation of all parts.
5. Keep all parts away from any source of fire.

EAS00021
REPLACEMENT PARTS

Use only genuine Yamaha parts for all replacements. Use oil and grease recom-mended by Yamaha for all lubrication jobs. Other brands may be similar in function and appearance, but inferior in quality.
EAS00022
GASKETS, OIL SEALS AND O-RINGS
1. When overhauling the engine, replace all gaskets, seals and O-rings. All gasket sur-faces, oil seal lips and O-rings must be cleaned.
2. During reassembly, properly oil all mating parts and bearings and lubricate the oil seal lips with grease.
1 - 19
GEN
IMPORTANT INFORMATION INFO
EAS00023
 LOCK WASHERS/PLATES AND COTTER
PINS
After removal, replace all lock washers/plates 1 and cotter pins. After the bolt or nut has been tightened to specification, bend the lock tabs along a flat of the bolt or nut.
EAS00024
BEARINGS AND OIL SEALS

Install bearings and oil seals so that the manu-facturer’s marks or numbers are visible. When installing oil seals, lubricate the oil seal lips with a light coat of lithium-soap-based grease. Oil bearings liberally when installing, if appro-priate.
1 Oil seal
CAUTION:

|
|
|
