 |


After adjusting the throttle cable free play, turn the handlebar to the right and to the left to ensure that this does not cause the engine idling speed to change.
|
|
|
|

▲▲▲▲▲▲▲▲▲▲▲ ▲▲▲▲▲▲▲▲▲ ▲▲▲▲▲▲▲▲▲▲▲▲
Ш Install:
left side cover
center cover
Refer to “SIDE COVER MOULDINGS AND
LEG SHIELD”.
CHECKING THE SPARK PLUGS
The following procedure applies to all of the spark plugs.
U Remove:
center cover
side cover (left and right)
inner fender
Refer to “SIDE COVER MOULDINGS AND
LEG SHIELD”.
V Disconnect:
spark plug caps
W Remove:
spark plugs
CAUTION:

Before removing the spark plugs, blow away any dirt accumulated in the spark plug wells with compressed air to prevent it from falling into the cylinders.
Й Check:
spark plug type Incorrect → Change.

Spark plug type (manufacturer)
CR7E (NGK)
3 - 25
CHECKING THE SPARK PLUGS/
CHECKING THE IGNITION TIMING
CHK
 ADJ
ADJ
К Check:
electrode 1
Damage/wear → Replace the spark plug.
insulator 2
Abnormal color → Replace the spark plug. Normal color is a medium-to-light tan color.
К Clean:
spark plug
(with a spark plug cleaner or wire brush)
К Measure:
spark plug gap a
(with a wire thickness gauge) Out of specification → Regap.


Spark plug gap
0.7 ~ 0.8 mm (0.028 ~ 0.031 in)
Л Install:
spark plug
T.
R.
13 Nm (1.3 m · kg, 9.4 ft · lb)

NOTE:

Before installing the spark plug, clean the spark plug and gasket surface.
М Connect:
spark plug caps 10.Install:
Inner fender
side cover (left and right)
center cover
Refer to “SIDE COVER MOULDINGS AND
LEG SHIELD”.
EAS00062
CHECKING THE IGNITION TIMING
NOTE:
Prior to checking the ignition timing, check the wiring connections of the entire ignition sys-tem. Make sure that all connections are tight and free of corrosion.

Remove:
center cover
side cover (left and right)
left footrest board
1Refer to “SIDE COVER MOULDINGS AND
LEG SHIELD”.
Remove:
timing plug 1
3 - 26
CHECKING THE IGNITION TIMING/
MEASURING THE COMPRESSION PRESSURE
CHK
ADJ
3. Install:

• timing light 1
(onto the spark plug lead of cylinder #1)

Timing light
YM-33277-B
| 4. Check: | |||
| • ignition timing | |||
| ▼▼▼▼▼▼▼▼▼▼▼ ▼▼▼▼▼▼▼▼▼ ▼▼▼▼▼▼▼▼▼▼▼▼ | |||
| a. Start the engine, warm it up for several min- | |||
| utes, and then let it run at the specified | |||
| engine idling speed. | |||
| Engine idling speed | |||
| 1,100 ~ 1,300 r/min | |||
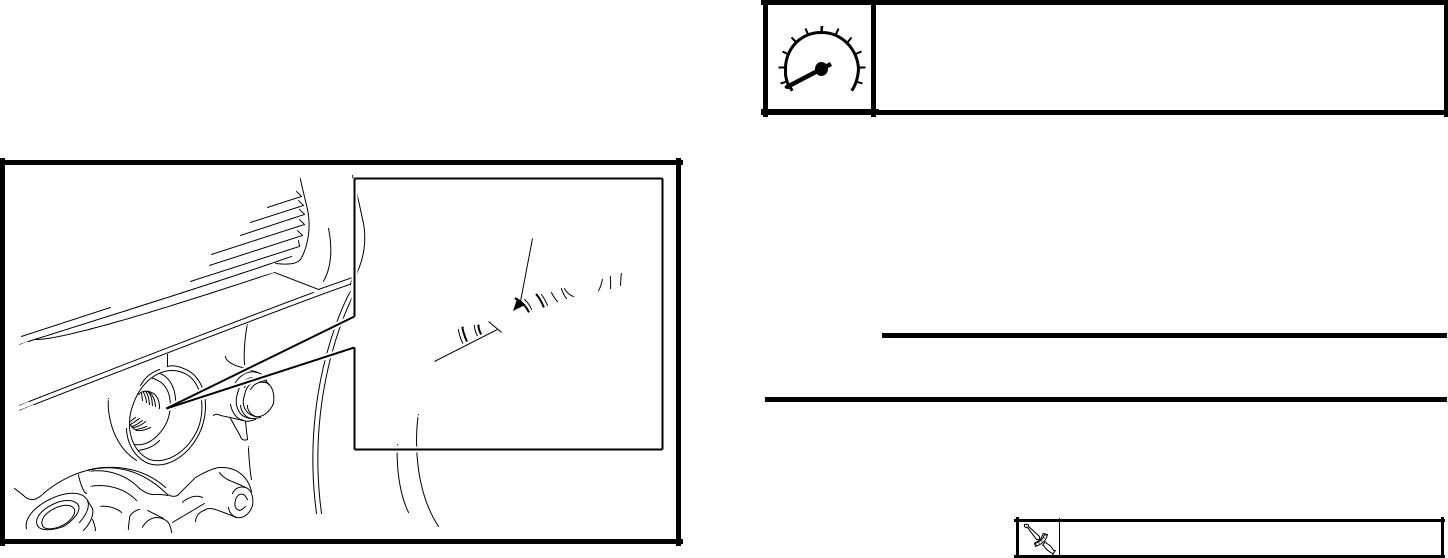
| b. Check that the stationary pointer a is within | |||
| the firing rang b on the A.C. magneto. | |||
| a | Incorrect firing range → Check the ignition | ||
| system. | |||
| NOTE: | |||
| b | The ignition timing is not adjustable. | ||
| ▲▲▲▲▲▲▲▲▲▲▲ ▲▲▲▲▲▲▲▲▲ ▲▲▲▲▲▲▲▲▲▲▲▲ | |||
| 5. | Install: | ||
| • timing plug | T.R.8 Nm (0.8 m · kg, 5.8 ft · lb) | ||
| 6. | Install: | ||
| • left footrest board | |||
| • side cover (left and right) | |||
| • center cover | |||
| Refer to “SIDE COVER MOULDINGS AND | |||
| LEG SHIELD”. |
|
|
|
EAS00065
MEASURING THE COMPRESSION
PRESSURE
The following procedure applies to all of the cylinders.
NOTE:

Insufficient compression pressure will result in a loss of performance.

3 - 27
CHK
MEASURING THE COMPRESSION PRESSURE ADJ
О Remove:
footrest board (left and right)
inner fender
Refer to “SIDE COVER MOULDINGS AND
LEG SHIELD”.
О Measure:
valve clearance
Out of specification → Adjust.
Refer to “ADJUSTING THE VALVE
CLEARANCE”.
О Start the engine, warm it up for several min-utes, and then turn it off.
О Disconnect:
spark plug cap
О Remove:
spark plug
CAUTION:
Before removing the spark plugs, use com-pressed air to blow away any dirt accumu-lated in the spark plug wells to prevent it from falling into the cylinders.

П Install:
compression gauge 1


Compression gauge 90890-03081, YU-33223
Extension 90890-04082
Р Measure:
compression pressure
Out of specification → Refer to steps (c) and (d).

Compression pressure at 360 r/min (at sea level)
Minimum 1,200 kPa
(12.0 kg/cm2, 170.7 psi) Standard
KPa
(14.0 kg/cm2, 199.1 psi) Maximum
KPa
(15.7 kg/cm2, 223.3 psi)
3 - 28
CHK
MEASURING THE COMPRESSION PRESSURE ADJ
▼▼▼▼▼▼▼▼▼▼▼ ▼▼▼▼▼▼▼▼▼ ▼▼▼▼▼▼▼▼▼▼▼▼
С Set the main switch to “ON”.
С With the throttle wide open, crank the engine until the reading on the compression gauge stabilizes.
|
|
|

 WARNING

|
|
|
