 |
When refilling, be careful that water does not enter the brake master cylinder reser-voir. Water will significantly lower the boiling point of the brake fluid and could cause vapor lock.
|
|
|
|

CAUTION:

Brake fluid may damage painted surfaces and plastic parts. Therefore, always clean up any spilt brake fluid immediately.

8. Bleed:
• brake system
Refer to “BLEEDING THE HYDRAULIC BRAKE SYSTEM (XP500)” and “BLEED-ING THE BRAKE SYSTEM (XP500A)” in chapter 3.
4 - 55
 FRONT AND REAR BRAKES CHAS
8. Check:

• brake fluid level
Below the minimum level mark a → Add the recommended brake fluid to the proper level.
Refer to “CHECKING THE BRAKE FLUID LEVEL” in chapter 3.
9. Check:
• brake lever operation
Soft or spongy feeling → Bleed the brake system.
Refer to “BLEEDING THE HYDRAULIC BRAKE SYSTEM (XP500)” and “BLEED-ING THE BRAKE SYSTEM (XP500A)” in chapter 3.
ASSEMBLING AND INSTALLING THE
REAR BRAKE CALIPER
 WARNING

• Before installation, all internal brake com-ponents should be cleaned and lubricated with clean or new brake fluid.
• Never use solvents on internal brake components as they will cause the piston seals to swell and distort.
• Whenever a brake caliper is disassem-bled, replace the brake caliper piston seals.

Recommended brake fluid
DOT 4

1. Install:
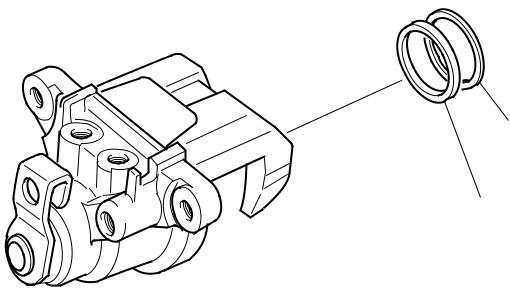
• brake caliper piston seal 1 New

• dust seal 2 New
2 New
1 New
4 - 56
 FRONT AND REAR BRAKES CHAS

 1
1

 a
a
b
a

11. Install:
• brake caliper piston 1
Turn the brake caliper piston clockwise until section a of the brake caliper piston is level with the surface of the brake caliper body.
NOTE:

Align the recesses b in the brake caliper pis-ton with the brake caliper body as shown in the illustration.

11. Install:
• brake caliper bracket
| T.R. | 40 Nm (4.0 m · kg, 29 ft · lb) |

• Install:
brake caliper 1 (temporarily)
• copper washers New
• brake hose 2
• union bolt 3  T 30 Nm (3.0 m · kg, 22 ft · lb)
 .
.
R.

 WARNING

Proper brake hose routing is essential to insure safe vehicle operation. Refer to “CABLE ROUTING” in chapter 2.

CAUTION:

When installing the brake hose onto the brake caliper, make sure the brake pipe touches the projection a on the brake cali-per.

• Remove:
brake caliper
4 - 57
 FRONT AND REAR BRAKES CHAS
Й Install:
brake pad springs
brake pads
brake caliper
rear brake caliper retaining bolts

T.
R.
27 Nm (2.7 m · kg, 19 ft · lb)
Refer to “REPLACING THE REAR BRAKE PADS”.
|
|
|
К Fill:
brake fluid reservoir
(with the specified amount of the recom-mended brake fluid)

Recommended brake fluid
DOT 4
 WARNING

Л Use only the designated brake fluid. Other brake fluids may cause the rubber seals to deteriorate, causing leakage and poor brake performance.
Л Refill with the same type of brake fluid that is already in the system. Mixing brake fluids may result in a harmful chemical reaction, leading to poor brake performance.
Л When refilling, be careful that water does not enter the reservoir. Water will signifi-cantly lower the boiling point of the brake fluid and could cause vapor lock.

CAUTION:

Brake fluid may damage painted surfaces and plastic parts. Therefore, always clean up any spilt brake fluid immediately.

П Bleed:
brake system
Refer to “BLEEDING THE HYDRAULIC BRAKE SYSTEM (XP500)” and “BLEED-ING THE BRAKE SYSTEM (XP500A)” in chapter 3.
4 - 58
 FRONT AND REAR BRAKES CHAS
Т Check:
brake fluid level
Below the minimum level mark a → Add the recommended brake fluid to the proper level.
Refer to “CHECKING THE BRAKE FLUID

LEVEL” in chapter 3. 10.Check:
У brake lever operation
Soft or spongy feeling → Bleed the brake system.
Refer to “BLEEDING THE HYDRAULIC BRAKE SYSTEM (XP500)” and “BLEED-ING THE BRAKE SYSTEM (XP500A)” in chapter 3.
11.Install:
Ф spring
Ф pin
Ф rear brake lock lever cable
Х nut 12.Adjust:
Х rear brake lock lever cable length
Refer to “ADJUSTING THE REAR BRAKE LOCK LEVER CABLE” in chapter 3.
4 - 59
 FRONT AND REAR BRAKES CHAS
EAS00888
|
|
|


