 |


Instrument function multi-function display
|
|
|
|
 WARNING

Be sure to stop the vehicle before making any setting changes to the multi-function display.

6 7 8 5


 A
A
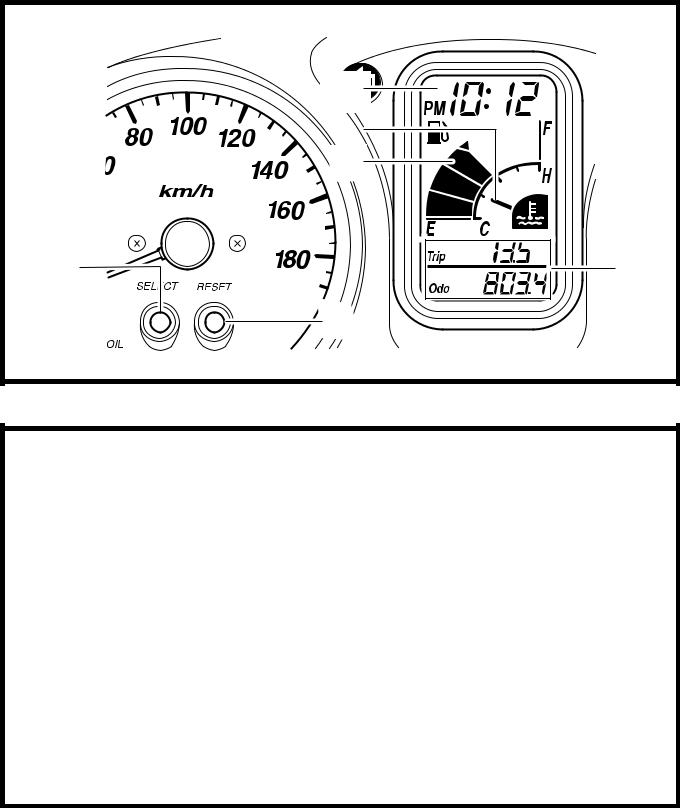
The multi-function display is equipped with the following:
• a fuel meter 1
• a coolant temperature meter 2
• an odometer (which shows the total dis-tance traveled), two tripmeters (which show the distance traveled since they were last set to zero), a fuel reserve tripmeter (which shows the distance traveled since the bot-tom segment of the fuel meter and fuel level warning symbol started flashing), a self-diagnosis device (engine and ABS) 3
• a clock 4
• an oil change indicator 5
• a V-belt replacement indicator 6
• a fuel level warning symbol 7
• a coolant temperature symbol 8
NOTE:

• Be sure to turn the key to “ON” before using the “SELECT” 9 and “RESET” 0 buttons.
• When the key is turned to “ON”, all of the dis-play segments of the multi-function display will appear one after the other and then dis-appear, in order to test the electrical circuit.
CAUTION:

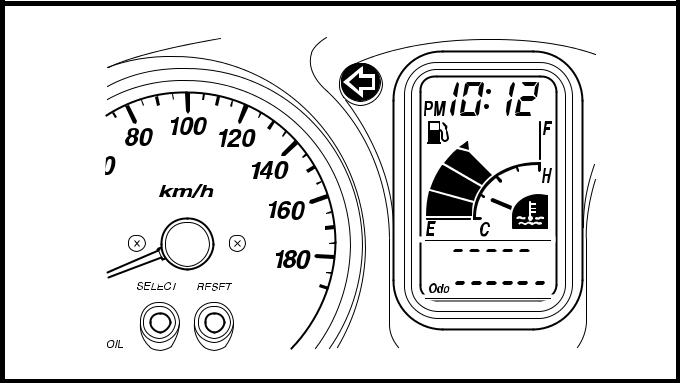
If bars A appear where the odometer and tripmeters are normally displayed, the multi-function display is malfunctioning. Replace the entire multi-function display.
Odometer and tripmeter modes
Pushing the “SELECT” button switches the display between the odometer mode “ODO” and the tripmeter modes “TRIP” in the follow-ing order:
ODO → TRIP F → TRIP (top) → TRIP (bot-tom) → ODO
1 - 15
 GEN
GEN
FEATURES INFO
When approximately 2.8 L (0.62 Imp gal, 0.74 US gal) of fuel remains in the fuel tank, the bottom segment of the fuel meter and fuel level warning symbol will start flashing, and the display will automatically change to the fuel reserve tripmeter mode “TRIP F” and start counting the distance traveled from that point. In that case, pushing the “SELECT” button switches the display between the various trip-meter and odometer modes in the following order:
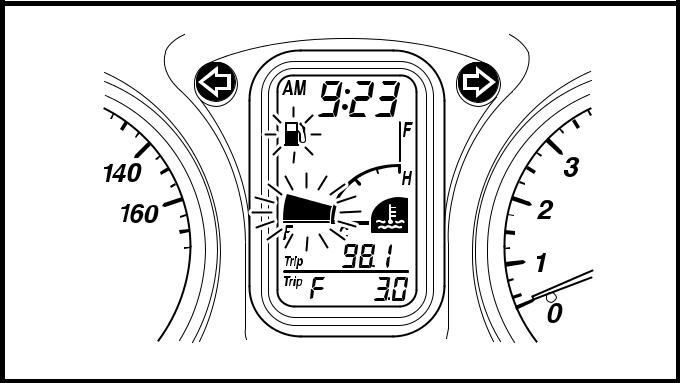
TRIP F → TRIP (top) → TRIP (bottom) →
ODO → TRIP F
To reset a tripmeter, select it by pushing the “SELECT” button, and then push the “RESET” button for at least one second. If you do not reset the fuel reserve tripmeter manually, it will reset itself automatically and the display will return to the prior mode after refueling and traveling 5 km (3 mi).
Fuel meter
With the key in the “ON” position, the fuel meter indicates the amount of fuel in the fuel tank. The display segments of the fuel meter disappear towards “E” (Empty) as the fuel level decreases. When the fuel level reaches the bottom segment near “E”, the fuel level warn-ing symbol and the bottom segment will flash. Refuel as soon as possible.
|
|
|
CAUTION:
If the fuel level is not displayed and the fuel level warning symbol, triangular mark, “E” line and “F” line flash in the fuel meter, the fuel level monitoring system is malfunc-tioning. Check the fuel sender and the elec-trical circuit.


Coolant temperature meter
With the key in the “ON” position, the coolant temperature meter indicates the temperature of the coolant. The coolant temperature varies with changes in the weather and engine load. If the top segment and coolant temperature symbol flash, stop the vehicle and let the engine cool.

CAUTION:
Do not operate the engine if it is overheated.
1 - 16
GEN
FEATURES INFO
Oil change indicator “OIL”
This indicator flashes at the initial 1,000 km (600 mi), then at 5,000 km (3,000 mi) and every 5,000 km (3,000 mi) thereafter to indi-cate that the engine oil should be changed.
After changing the engine oil, reset the oil change indicator. Refer to “To reset the oil change indicator light”.
If the engine oil is changed before the oil change indicator comes on (i.e. before the periodic oil change interval has been reached), the indicator must be reset after the oil change for the next periodic oil change to be indicated at the correct time.
The electrical circuit of the indicator can be checked according to the following procedure.
1. Set the engine stop switch to “  ” and turn the key to “ON”.
2. Check that the indicator comes on for a few seconds and then goes off.
3. If the indicator does not come on, check the electrical circuit. Refer to “SIGNALING SYSTEM” in chapter 8.

NOTE:
The oil change indicator may flash when the engine is revved with the scooter on the cen-terstand, but this does not indicate a malfunc-tion.
|
|
|
