 |


Cleaning by hand. 5-2-4 How to adjust the carriageЎЇs height. 5-2-5 How to begin/pause/stop printing. 5-2-6 Classification of Different Printing Mode
|
|
|
|
Cleaning by hand
When all the cleaning mode does not work, please try to clean it by hand.
(1) Find the matt pad and ink pump piping connections, brush aside the connection, and then connect glass cylinder with ink matt. Let the carriage back to the original starting point, and allow the machine to return to the standby status (refer to the previous section). 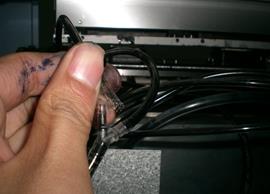
(2)  Take out the ink from the glass cylinder, about 15-20 ml.
(3) Disconnect the glass cylinder and ink mattЈreconnect the ink matt
and ink-taking channel to carry out cleaning( Please see the former chapter as reference)
5-2-4 How to adjust the carriageЎЇs height
In order to get used to different thickness material, we need to adjust the height of the carriage according to the thickness of the material.

 Increase the carriageЎЇs height:
 |
Rotate the adjusting nut clockwise
can increase the height of the carriage
(larger distance with the material)

 |
Reduce the carriageЎЇs height:
 |
Rotate the adjusting nut counter-clockwise
can reduce the height of the carriage
(smaller distance with the material)
 |
5-2-5 How to begin/pause/stop printing
Begin PrintingЈє
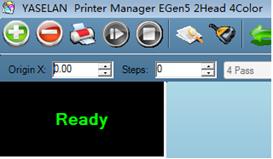
(1) Open the file about to print, run the software. Click the running button to choose the file. Also can choose the file in RIP software.
 |
(2) Set the printing parameter

Set the print properties, sets the white bar in the software real-time parameter setting, print speed, print mode (single and dual) and whether to use the file set.
(3) Begin Printing, after confirming the task properties, click OK to start printing
Pause PrintingЈє
Pause Printing can be done by LCD control panel or software respectively.
LCD control panel:

| ||||||
|
| |||||

 During Printing press the pause/resume button once to pause printing that in progress, the LCD will automatically display the Pause option; press the cleaning button to begin the nozzle cleaning.
Control Software:
During printing, click the pause button to pause printing after which can clean the print head.
 Then click continue button to
resume the previous printing.
Stop PrintingЈє
Stop printing can be done by LCD control panel or software respectively.
LCD control panel:


|  | |||||
 | ||||||
During the printingЈclick the Ў° cancel button Ў±once then click the Ў° right direction button Ў± and then click Ў° YES Ў± to stop the current printing.
|
|
|
Control Software:
During the printing, click the Ў° stop Ў± button on the toolbar and then click the Ў° enter Ў± to
stop the current printing.
 |
5-2-6 Classification of Different Printing Mode
The following will introduce in more detail the different printing mode with different Ў°PASSЎ±, productivity every hour and recommended printing mode.
Printing Mode Available
| Xunlang VanGogh(Eco-Solvent)Double Print head Printing Mode (Single Head will reduce productivity by 45%) | ||||||
| Printing Mode | Mode Description |
Number | Productivity/H | Materials Recommendations | ||
| 360DPI | Draft Mode (Average Quality) | 4PASS | 34㎡ /H | Exterior lighting light box cloth/PP media (process color images) | ||
| 360DPI | Fine Draft (Normally Use Fast Printing Mode) | 4PASS | 24㎡ /H | Exterior lighting light box cloth/PP paper (process color images) | ||
| 360DPI | Saturated Fine Draft (Ink is more saturated than fine draft) | 4PASS | 24㎡ /H | Exterior lighting light box cloth/PP paper (process color images) | ||
| 720DPI | Fast& Fine (Fast Mode) | 6PASS | 21㎡ /H | Exterior lighting light box cloth paper/PP paper/photo paper/ car body (solid color images) | ||
| 720DPI | Saturated& Fine (Precision is higher than Fast& Fine) | 6PASS | 14㎡ /H | Exterior lighting light box cloth paper/PP paper/photo paper/ car body (solid color images) | ||
| 720DPI | Fast High Quality (Precision is higher than Fast& Fine) | 8PASS | 16㎡ /H | car body post/photo paper/ the lamphouse cloth | ||
| 720DPI | Saturated High Quality (slow speed high quality precision is higher than fast speed mode) | 8PASS | 11㎡ /H | car body post/photo paper/ the lamphouse cloth | ||
| 720DPI | Super High Quality (For special Material) | 12PASS | 8㎡ /H | Lamp light sheet/film/film/and other special materials | ||
|
Xunlang VanGogh(Water-based)Double-head Printing (Single headЎЇs productivity will reduce by 45%) | ||||||
| Printing Mode | Mode Description | PASS Number | Productivity/H (In Theory) | Materials Recommendations | ||
| 360DPI | Draft Mode (Average Quality) | 4PASS | 34㎡ /H | PP paper (process color images) | ||
| 360DPI | Fine Draft (Normally Use Fast Printing Mode) | 4PASS | 24㎡ /H | PP paper (process color images) | ||
| 720DPI | Fine Draft (Normally Use Fast Printing Mode) | 6PASS | 21㎡ /H | PP paper/photo paper/film (solid color Image) | ||
| 720DPI | Fast High Quality (Precision is higher than Fast& Fine) | 6PASS | 14㎡ /H | PP paper/ film paper/canvas (solid color image) | ||
| 720DPI | Fast High Quality (Precision is higher than Fast& Fine) | 8PASS | 16㎡ /H | Photo paper/external lamp/film | ||
| 720DPI | Super High Quality (For special Material) | 12PASS | 8㎡ /H | Internal lamp/film/film/other special material | ||
 5-2-7 How to Take Up the Media
|
|
|
 (1) When put the file that about to be printed into the taking up system, use 3 three sticky notes( Car stickers or PP gum) Stick the picture on the Media Tube's left, middle and right.
(2) According tension of the material, adjust the taking up media's torque and speed (see the next section for details)
|
|
|
