 |


4-4-1 Connect Ink Tank Channels
|
|
|
|
4-4-1 Connect Ink Tank Channels
(1) Prepare a pipe of the certain length (recommendation10CM), link the pipe ends with connecting nuts, and then fitted with gaskets.
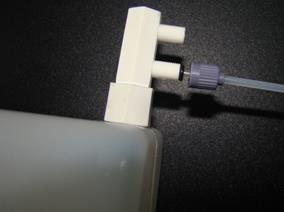 |
(2) Connect one side of the prepared pipe with the ink tube connecting point. Insert pipe into the connection until the bottom. And then fix the
connecting nut at the ink tank.
 |
(3) Connect the other end of the pipe with the control valve, also insert the pipe into the bottom and tighten the connection nut.
(4)  As the 1st step and then prepare a pipeline (10CM), connect on side with spiral and washer and then the other end of the control valve and tighten
the connection nut.
 |
(5) Repeat step 1--4 and Link the other side of Ink tube's connection to the tube and control valve.
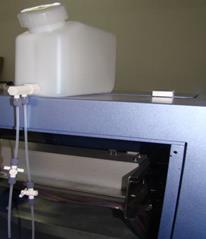
 4-4-2 Install the Ink Tank
Put the ink box that connected with
the tube into the ink bottle.
 4-5 Install the Ground Cable
(1) 
 Bury iron bar
use 1. 5 meters in diameter of round steel (1cm - 2 cm)
or angles steel to bury in the damp soil.
 | |||
 | |||
(2) Irrigate the brine
Use 500 g of edible salt and 1000 g water to make salt water
and then irrigate on the iron bar.


(3) Connect the Cable
Find a 2 mm diameter cableЈand use a welding gun to weld the cable in the barЈЁuneasy to fallЈ©, Connect the other end with the screws that ground cable marked of the machine. If there is no sign, could connect to the bare shell of the machine parts (part without spray painted, such as Castor and the common power strip ground cable) 
(4) Measurement of Earth resistance
 Under the machine power is on, Use the neon-electroscope to measure the Ў°Live and Neutral" of the machine (measurement method, please refer to the relevant document)
Then shut down the machine, turn the multimeter's resistance to the minimum, measure the resistance between ground and neutral, the resistance should be less than 10 ohms.
5 How to use
5-1 How to use-- basics
5-1-1 How to connect USB Cable
The following will described in detail how to connect the USB cable and switch machine.

As the picture shows, use the USB cable to connect the machine with the computer.
 | |||||
 | |||||
 | |||||
5-1-2 How to Connect the Power Cable
When connecting the power cable, in following specifications socket, connect the power cables:
Voltage: 220 VЎА 10%
Frequency: 50 Hz ЎА 1 Hz
Power: 8 A (more than 1500 W) {s-series 10 A (more than 2000 W)}
 |
(1) As the following picture shows, connect the power supply cable:
|
|
|
 | |||
 | |||
(2) As the follow picture showsЈthrough the switch, turn on or cut off the Power supply.
 Connect the Power supply
Turn the switch to 1 to turn on the Power supply
 | ||
 | ||
Cut off the Power Supply
 |
Turn the power supply to O to cut off the
Power supply

5-1-3 How to Install the Driver
If it is the very first time to link the machine to the computerЈthe computer will shows the new hardware at the lower right corner, as the picture shows, now we install the driver step by step.
(1) Find The New Hardware
 |
(2) Hardware Guiding Appears Automatically.
 |
(3)
 |
Click automatic installation
(4)
 |
Click the Ў°finishЎ± complete.
 5-1-4 How to Add the Ink
The picture will show how to add
the bottle ink or bag ink.
Bottle Package Ink Adding
Bottle Cap unscrewed, open the sealing film
with a knife and then pour the ink into
the ink tank.
 B
B
Bag Package Ink Adding

Take the ink bag of out of the box, and then in a corner with scissors, cut a small opening, and then put the ink into the ink tank the same way as bottle ink's.

|
|
|
