 |


Basic principles of flexibility development
|
|
|
|
Warm-up and stretch properly.
Combine relaxation, stretching and strengthening exercises with the weight of one’s own body.
Perform stretching slowly up to the point of feeling slight tension.
Never exceed pain threshold.
Not always is it possible to reach maximum position.
Concentrate on stretched area and do not forget about regular breathing.
Stretch less flexible part of the body first.
In static exercises, hold in limit positions up to 60 seconds.
A complex of 8-12 exercises for different joints within one training block.
Stretch back less intensively but more frequently.
Recommended books:
Tourism Principles and Practice.5th Edition John Fletcher, Alan Fyall, David Gilbert, Stephen Wanhill Jun 2013
Introduction to Hospitality: Pearson New International Edition 06th Edition John Walker Aug 2013
Thinking through Tourism By Julie ScottBerg, 2010
The Business of Tourism 9th Edition Chris Holloway, Claire Humphreys Jun 2012
Research Methods for Leisure and Tourism 4th Edition A.J. Veal Mar 2011
Essentials of Tourism Chris Cooper Sep 2011
Research Methods for Arts and Event Management A.J. Veal, Christine Burton Aug 2014
№ 7 Factors which influence on the body of tourists in mountains.
Plan of lecture:
1. High altitude climate.
2. altitude sickness
3. Acclimatization
The effects of high altitude on humans are considerable. The percentage oxygen saturation of hemoglobin determines the content of oxygen in blood. After the human bodyreaches around 2,100 m (7,000 feet) above sea level, the saturation of oxyhemoglobin begins to plummet.[1] However, the human body has both short-term and long-term adaptationsto altitude that allow it to partially compensate for the lack of oxygen. Athletes use these adaptations to help their performance. There is a limit to the level of adaptation; mountaineers refer to the altitudes above 8,000 metres (26,000 ft) as the "death zone", where no human body can acclimatize, although the subject is debated.
Effects as a function of altitude
The human body can perform best at sea level, where the atmospheric pressure is 101,325 Pa or 1013.25 millibars (or 1 atm, by definition). The concentration of oxygen (O2) in sea-level air is 20.9%, so the partial pressure of O2 (pO2) is 21.136 kPa. In healthy individuals, this saturates hemoglobin, the oxygen-binding red pigment in red blood cells.
Atmospheric pressure decreases exponentially with altitude while the O2 fraction remains constant to about 100 km, so pO2 decreases exponentially with altitude as well. It is about half of its sea-level value at 5,000 m (16,000 ft), the altitude of the Everest Base Camp, and only a third at 8,848 m (29,029 ft), the summit of Mount Everest.[4] When pO2 drops, the body responds with altitude acclimatization.
Mountain medicine recognizes three altitude regions that reflect the lowered amount of oxygen in the atmosphere:
High altitude = 1,500–3,500 metres (4,900–11,500 ft)
|
|
|
Very high altitude = 3,500–5,500 metres (11,500–18,000 ft)
Extreme altitude = above 5,500 metres (18,000 ft)
Travel to each of these altitude regions can lead to medical problems, from the mild symptoms of acute mountain sickness to the potentially fatal high altitude pulmonary edema (HAPE) and high altitude cerebral edema (HACE). The higher the altitude, the greater the risk. Research also indicates elevated risk of permanent brain damage in people climbing to extreme altitudes. Expedition doctors commonly stock a supply of dexamethasone, or "dex," to treat these conditions on site.
Humans have survived for two years at 5,950 m (19,520 ft) [475 millibars of atmospheric pressure], which is the highest recorded permanently tolerable altitude; the highest permanent settlement known, La Rinconada, is at 5,100 m (16,700 ft). At extreme altitudes, above 7,500 m (24,600 ft) [383 millibars of atmospheric pressure], sleeping becomes very difficult, digesting food is near-impossible, and the risk of HAPE or HACE increases greatly.
Death zone
The summit of Mount Everest is in the death zone.
The death zone, in mountaineering, refers to altitudes above a certain point where the amount of oxygen is insufficient to sustain human life. This point is generally tagged as 8,000 m (26,000 ft) [less than 356 millibars of atmospheric pressure]. The concept of the death zone (originally the lethal zone) was first conceived by Edouard Wyss-Dunant, a Swiss doctor, in an article about acclimatization published in the journal of the Swiss Foundation for Alpine Research.
Many deaths in high-altitude mountaineering have been caused by the effects of the death zone, either directly (loss of vital functions) or indirectly (wrong decisions made under stress, physical weakening leading to accidents). In the death zone, the human body cannot acclimatize. An extended stay in the zone without supplementary oxygen will result in deterioration of bodily functions, loss of consciousness, and, ultimately, death.
Scientists at the High Altitude Pathology Institute in Bolivia dispute the existence of a death zone, based on observation of extreme tolerance to hypoxia in patients with chronic mountain sickness and normal fetuses in-utero, both of which present pO2 levels similar to those at the summit of Mount Everest.
The summit of K2 is in the death zone
Long-term effects
Main article: High-altitude adaptation in humans
Studies have shown that the 140 million people who live at altitudes above 2,500 metres (8,200 ft) have adapted to the lower oxygen levels. These adaptations are especially pronounced in people living in the Andes and in the Himalayas: compared with acclimatized newcomers, native Andean and Himalayan populations have better oxygenation at birth, enlarged lung volumes throughout life, and a higher capacity for exercise. Tibetans demonstrate a sustained increase in cerebral blood flow, lower hemoglobin concentration, and less susceptibility to chronic mountain sickness (CMS). These adaptations may reflect the longer history of high altitude habitation in these regions.
There is a significantly lower mortality rate for permanent residents at higher altitudes.[20] Similarly, there is a dose response relationship between increasing elevation and decreasing obesity prevalence in the United States. This is not explained by migration alone. On the other hand, people living at higher elevations also have a higher rate of suicide in the United States. The correlation between elevation and suicide risk was present even when the researchers control for known suicide risk factors, including age, gender, race and income. Research also indicates that oxygen levels are unlikely to be a factor, considering that there is no indication of increased mood disturbances at high altitude in those with sleep apnea or in heavy smokers at high altitude. The cause for the increased suicide risk is unknown so far.
|
|
|
Acclimatization to altitude
The human body can adapt to high altitude through both immediate and long-term acclimatization. At high altitude, in the short term, the lack of oxygen is sensed by the carotid bodies, which causes an increase in the breathing rate (hyperventilation). However, hyperventilation also causes the adverse effect of respiratory alkalosis, inhibiting the respiratory center from enhancing the respiratory rate as much as would be required. Inability to increase the breathing rate can be caused by inadequate carotid body response or pulmonary or renal disease.
In addition, at high altitude, the heart beats faster; the stroke volume is slightly decreased; and non-essential bodily functions are suppressed, resulting in a decline in food digestion efficiency (as the body suppresses the digestive system in favor of increasing its cardiopulmonary reserves).
Full acclimatization, however, requires days or even weeks. Gradually, the body compensates for the respiratory alkalosis by renal excretion of bicarbonate, allowing adequate respiration to provide oxygen without risking alkalosis. It takes about four days at any given altitude and can be enhanced by drugs such as acetazolamide.[24] Eventually, the body has lower lactate production (because reduced glucose breakdown decreases the amount of lactate formed), decreased plasma volume, increased hematocrit (polycythemia), increased RBC mass, a higher concentration of capillaries in skeletal muscle tissue, increased myoglobin, increased mitochondria, increased aerobic enzyme concentration, increase in 2,3-BPG, hypoxic pulmonary vasoconstriction, and right ventricular hypertrophy. Pulmonary artery pressure increases in an effort to oxygenate more blood.
Full hematological adaptation to high altitude is achieved when the increase of red blood cells reaches a plateau and stops. The length of full hematological adaptation can be approximated by multiplying the altitude in kilometers by 11.4 days. For example, to adapt to 4,000 metres (13,000 ft) of altitude would require 45.6 days.[26] The upper altitude limit of this linear relationship has not been fully established.[10][2]
Altitude and athletic performance
For athletes, high altitude produces two contradictory effects on performance. For explosive events (sprints up to 400 metres, long jump, triple jump) the reduction in atmospheric pressure means there is less resistance from the atmosphere and the athlete's performance will generally be better at high altitude.[27] For endurance events (races of 800 metres or more), the predominant effect is the reduction in oxygen, which generally reduces the athlete's performance at high altitude. Sports organizations acknowledge the effects of altitude on performance: the International Association of Athletics Federations (IAAF), for example, have ruled that performances achieved at an altitude greater than 1,000 metres will be approved for record purposes, but carry the notation of "A" to denote they were set at altitude. The 1968 Summer Olympics were held at altitude in Mexico City. With the best athletes in the world competing for the most prestigious title, most short sprint and jump records were set there at altitude. Other records were also set at altitude in anticipation of those Olympics. Bob Beamon's record in the long jump held for almost 23 years and has only been beaten once without altitude orwind assistance. Many of the other records set at Mexico City were later surpassed by marks set at altitude.
|
|
|
Athletes can also take advantage of altitude acclimatization to increase their performance. The same changes that help the body cope with high altitude increase performance back at sea level. However, this may not always be the case. Any positive acclimatization effects may be negated by a de-training effect as the athletes are usually not able to exercise with as much intensity at high altitudes compared to sea level.
This conundrum led to the development of the altitude training modality known as "Live-High, Train-Low", whereby the athlete spends many hours a day resting and sleeping at one (high) altitude, but performs a significant portion of their training, possibly all of it, at another (lower) altitude. A series of studies conducted in Utah in the late 1990s by researchers Ben Levine, Jim Stray-Gundersen, and others, showed significant performance gains in athletes who followed such a protocol for several weeks. Other studies have shown performance gains from merely performing some exercising sessions at high altitude, yet living at sea level.
The performance-enhancing effect of altitude training could be due to increased red blood cell count, more efficient training, or changes in muscle physiology.[
Self –assessment questions
1. What is acclimatization?
2. Alpine climate and altitude sickness;
3. What are the methods of tourism training;
Recommended books:
1. Tourism Principles and Practice.5th Edition John Fletcher, Alan Fyall, David Gilbert, Stephen Wanhill Jun 2013
2. Introduction to Hospitality: Pearson New International Edition 06th Edition John Walker Aug 2013
3. Thinking through Tourism By Julie ScottBerg, 2010
4. The Business of Tourism 9th Edition Chris Holloway, Claire Humphreys Jun 2012
5. Research Methods for Leisure and Tourism 4th Edition A.J. Veal Mar 2011
6. Essentials of Tourism Chris Cooper Sep 2011
7. Research Methods for Arts and Event Management A.J. Veal, Christine Burton Aug 2014
№ 8 Regime and hygiene of tourists
The purpose of the lecture: Explain the role of the regime and health tourists
Keywords: tourist mode, tempering, catering
Plan of lecture
1. Routine of tourist..
2. Hygiene of tourist
3. Nutrition of tourist
Following are some training routines that have been developed through our own experience as well as that of our friends and associates. We are not professional exercise people. We are serious about our climbing and have seen the benefits of making training an integral part of our activities for many years. Our beliefs concerning training for climbing are the result of years of asking questions and searching for answers.
From our perspective, the single most important thing to keep in mind is that each of us has a very unique and complex body. To be most effective, your training program starts with a critical and complete assessment of your strengths and weaknesses  along with your goals for climbing. If you use this realistic list as a filter for all the information available, hopefully you will end up with an individual program that is ideally suited to you. There are now many sources of information out there that pertain to training for climbing. Try to keep in mind who you are and who the information is targeted to, a person who can afford to climb and train full time or the weekend athlete who wants to make some gains in strength and confidence.
|
|
|
The bottom line in training is that you must be responsible for your own body and your own training schedule. Research the available information, listen to the "experts", take the time to experiment, and then do what works best for you.
Contact Strength or Finger Training is a Crucial Part of Improving Your Climbing
With the popularity and increased access to indoor climbing walls, fingerboards are becoming a second line method of training. However, we feel that there are some great advantages to the convenience and specificity of training boards. Having a board mounted in a doorway to a spare room or your garage makes it easy to schedule a quick workout if a little time is all you have. The specific nature of fingerboard training enables you to gauge your progress much more effectively than bouldering at the rock gym or your home wall. It is easier to control if and when you fail doing a set exercise on a particular hold on a board, than if you are desperately thrutching for the last hold on your latest plastic bouldering test-piece. This factor will hopefully permit you to work to your limits while minimizing the chance of injury to your fingers.
Finger training programs can be difficult to figure out. Keep in mind that what you are strengthening is essentially connective tissue, tendons and ligaments. It takes a long time to notice gains in strength in this tissue and a very long time to heal once it has been injured. If you are using fingerboard training in addition to indoor climbing on plastic, be aware of how much stress you are putting on your fingers and arms, and be careful to not over-do your training. If you start having problems, allow yourself time to heal. If problems continue, specifically long-term pain and swelling in your fingers, consult a sports-oriented physician.
The Training
There are two general categories of exercises that you can do on your Metolius training board. In simple terms, they are exercises that build power or exercises that build stamina /endurance. Endurance-oriented exercises are a set of tasks that put your muscles in a more or less aerobic state; that is, training your muscles to function for extended periods. They generally are a longer duration and a lower load exercises and you are maintaining a lower level "burn" in the muscles than the pump you get at the limit of your strength. Power-oriented exercises focus on short duration, higher load tasks that your muscles can't maintain for very long. With these exercises, you are building strength (muscle fiber size) and the capacity to recruit more muscle fibers for short, quick bursts of movement.
Any of the training that follows assumes a good base strength level. Most of the work or exercises that follow are power-oriented for a couple of reasons:
We feel that you can develop some endurance from a power workout, but you cannot develop good power from an endurance-oriented workout and in fact, it is best if they are trained independently.
It is hard both physically and mentally, to hang on a board for the extended periods required to totally target endurance.
The amount of load you use for each exercise is up to you to determine. We feel the most gains happen if you use a safe maximum load for the cycle that you are in. Try to pick a load that allows you to barely hold on for the time indicated in the exercise. Load is determined relative to your body weight. If you need to add weight, use a weight belt. If you need to reduce weight, use a chair or step stool set back from and under the board that allows you push with one leg. Make sure your other leg stays below you, so that if you fall, you land on your feet. You can use a bathroom scale on a chair to give you a more accurate idea of how much weight you are taking off (see illustration). If you don't feel safe using this method, have a partner lift you instead.
Use Partners
Partners can check your time and remove or add weight as well as give you assistance and cheer you on when you're trying to get that last bit of effort out. Having a partner spot you when training to absolute failure is highly recommended.
Setup A Workout Schedule & Stick To It
Make a chart and use it to keep track of your training. If you keep a detailed record showing amounts of weight and/or assistance for each segment of an exercise, it will be much easier to slowly increase your workload. These records will help you get the most benefit from your training time.
Use Any of the Holds For Any Exercise
You will probably find that certain holds are better suited to certain exercises than others. For example, you would probably do pull-ups on different holds than short duration hangs. It is also important to look at your weakest points and train those first. For example, if you have a hard time holding onto sloping holds, focus your training there early in your workouts. It is also a good idea to change the holds you use for a given exercise every few weeks, to maximize the effectiveness of your training.
|
|
|
Dos & Don'ts
Avoid doing an excessive number of pull-ups on your board. A lot of pull-ups on a static bar can lead to elbow joint injuries. If you wish to do more pull-ups than our exercises indicate, we recommend that you use Metolius Rock Rings.
 Avoid range of motion exercises for your fingers on any training board. Once you place weight on a hold do not attempt to move your fingers (don't do mini pull-ups with your fingers) as this can lead to injury.
Avoid using crimp or cling grips. A very important aspect concerning any hold is how you hold on to it. It is extremely important that you do not use any kind of cling technique regularly. Because of the increased angle of your fingers while clinging, the load on your finger joint is far too high to be safe for training purposes. We have found that if you keep your hand more open, you will be safer and still can strengthen your fingers for both open-handed and cling holds. The illustration pictured shows both types of holds. Use chalk when training and occasionally clean your board with a nylon brush to maintain a consistent surface.
The Tasks
Following are the basic elements of exercises that can be done on your training board:
Hangs - either straight arm or bent arm, one arm or both. When hanging straight, there should still be a slight bend to the elbows.
Pull-ups - can be done with the hands parallel or offset (one of your hands on a higher or smaller hold than the other). Offset pulls put more training stress on the higher or smaller hold arm and can more effectively simulate certain climbing situations.
Knee Lifts - Hang on good holds and bring your knees to your chest, bending at the waist and knees. This task works the often overlooked abdominals for that solid mid-body connection.
Shoulder Shrugs - Hang as above and raise and lower your body without bending your elbows. This exercise works several different muscle groups in the shoulder girdle. As with pull-ups, we would recommend keeping repetitions low.
Cyclic Periodization
As an overall strategy, cyclic periodization allows you to be at your peak when you want to be. Whether this corresponds to a big road trip or pushing your limits when the weather is the best is up to you. If properly done chances of injury and mental burnout are minimized and gains in strength and power are optimized.
The concept is simple; build a base of endurance then work toward maximum power. By pushing your body in these cycles you strike a balance between letting yourself be fresh and strong within the cycles and not letting yourself totally adapt to the stresses of the workouts. This keeps you from stalling at different plateaus and makes the gains possible much greater than doing the same sets of workouts month after month. Immediately following the peak cycle you should be ready to climb strongly. The Cycle Shown Below Would Start Again In June.
| I N T E N S I T Y | Peak Cycle Intensity = 80-100% Volume = Low Loads = High Repetitions = Low Frequency = 2-3 days a week Maximum strength and power. Most exercises done to failure. Taper training and focus on climbing midway through the cycle. After cycle ends, no gym time. You should be in peak condition for the crags for 4 to 6 weeks. | |||
| Load Cycle Intensity = 75% Volume = Moderate/High Loads = Medium Repetitions = Moderate Frequency = 3-4 days a week The foundation, endurance, connective tissue strength, some muscle power building. | ||||
| Conditioning Cycle Intensity = 60% Volume = Moderate Loads = Low Repetitions = High Frequency = 2-3 days a week Warm-up and active rest cycle. Preparation for more strenuous cycles | ||||
| Recovery Cycle Intensity = 50% Volume = Low Loads = Light Repetitions = Low Frequency = 2 days a week Rest and recovery, prep for peak cycle. | ||||
| 2 weeks November | 10 weeks December - January | 2 weeks February | 8 weeks March - April |
Definitions
Intensity = A percentage of your maximum effort, as applied to a single set or an overall workout. As an example; when you are fully rested and it is all you can do to hang on a particular hold for one minute, then 65% intensity would be hanging for 40 seconds on the same hold. Picking an easy to measure test such as this and getting to know the level of "pump" that corresponds to that intensity, then allows you to tailor other exercises to your particular goal. This is the crucial element of any workout program, one that determines the other elements and one that needs the most attention and adjustment. Think of intensity as a set point that you need to adjust upward as you get stronger or adjust downward if you are not recovering between workouts.
Volume = The length of your workout or how many sets or exercises. This is one of the easiest elements to adjust according to where you are in your training regime (up as you get stronger, down if you are not recovering). Remember volume is not the same as intensity.
Load = How much weight relative to body weight. This assumes that for many of the exercises with certain holds you will need to add weight (by using a weighted belt) or subtract weight (by having a spotter lift you or by placing a footstool under the board to lightly put one foot on) to hang for a particular time for a set intensity.
Repetitions = How many pull-ups or separate movements in an exercise.
Frequency = How many days per week to train.
Other Elements to Consider
Warm-up: Take plenty of time to stretch and lightly work all the muscles you are going to use in your workout session. Drink plenty of water during and following workouts.
Train smart: Know the difference between a healthy muscle ache and pain associated with connective tissue damage. There is no quicker way to sabotage your climbing goals than to try to train through injuries.
Rest: figure out what you need for the different cycles and take it! You should go into each workout without muscle pain.
Micro-cycles: These are incorporated into the longer, harder main cycles (load and peak) to keep you from plateauing within the cycle. Usually done in a hard day! easy day! moderate day. This is intended to break up your routines enough that you stay rested, but still are not letting your body settle into one medium mode.
The Exercises
The 10-minute sequences lend themselves to experimentation. They are good combinations of endurance and power work and can be adapted to training for a specific climb. Keep in mind some general guidelines when thinking about adapting exercises to yourself. Power exercises keep durations of tasks short, with heavier or harder loads. Endurance exercises are longer, less intense; you should feel like you are maintaining a low-level pump. The easiest element of the exercises to change is generally load; be familiar with the various ways to do this. In the 10 minute sequences, if a 2-minute rest is not indicated, proceed immediately to the next task.
Warming Up
One of the most important steps in muscular development and injury prevention is a thorough warm up. Generally, the best way to do this is to warm up the large muscles that will be used first, and then move to the smaller. There are various ways to accomplish this; start with low level aerobics, then general calisthenics or weight lifting. You can follow this with a series of one or two pull-ups or a 10 to 20 second hang on each hold on your board, with a 30s rest between each task. Take time to stretch after you are warmed up, once again starting with the large muscles and working your way to your fingers. After you are completely warmed up give yourself a rest of 5 to 10 minutes before starting the workout.
Extra Training Tips
Always give yourself enough time for a thorough warm-up. This is undoubtedly the best thing you can do to keep yourself injury free.
Take some time before you start each hang to work your fingers into the hold. This "milking the hold" enables you to get a more powerful grip and mentally prepares you for the task ahead.
When you are ready to hang for a time and after you have set yourself on the hold, let your body down directly below the hold, so that when you raise your feet your body does not swing. Swinging makes it a lot harder to hang on.
To be most effective, once you have milked the holds and started your hang, don't move your fingers on the hold. This is especially true when hanging on slopers.
Brush the holds on your board frequently, even between exercises. Knowing the holds are clean and grease free is a big boost psychologically.
Chalk your hands and fingers well before each task. For superior performance, on plastic or rock, use Metolius Super Chalk.
Personalize your training regime and then stick to it. If you have a balanced program, with enough variety to keep you motivated you will get stronger. It takes time to see improvements, patience will make the gains come sooner.
If you feel stuck on a major plateau, go back over your original expectations and make sure they are realistic. Often, stalling may indicate you need more rest or a break from some part of your routine. Or it may mean take a look at what you can do to improve your motivation. Find a good partner to train with, dream about your next trip, or think about how good you will feel once you're done with your workout. Anything you can do to maintain your positive attitude will pay off big!
The optimal body fat percentage is 6 to 12 percent for men and 8 to 16 percent for women. If you’re not sure how you measure up, consider having your body fat tested. Or you can use the economic pinch-an-inch method on your waistline (actually a good gauge). If you can pinch an inch (or more), you are not in the optimal range.
Similarly, excessive muscular weight is about as bad as excessive fat. In fact, since muscle weighs more than fat per unit volume, large muscles in the wrong place are worse than fat. Inappropriate training is the usual cause of unwanted muscle. For instance, the leg exercises performed by bodybuilders or bike racers are a waste of time for climbers since lack of leg strength is rarely a limiting factor on the rock. Biceps curls and heavy bench-press exercises will likewise have a negative impact on climbing performance. Sure, they will pump you up nicely for the beach, but they will also weigh you down on the rock. Fortunately, you can strip away unwanted fat and excessively bulky muscles (within generically encoded limitations) with disciplined diet and aerobic exercise.
The dietary strategy is to reduce empty calories from junk foods and high-fat fast foods, while maintaining a steady consumption of protein and carbohydrate. The ideal macronutrient caloric breakdown for an athlete is 65 percent carbohydrate, 15 percent protein, and only 20 percent fat. Consequently, you can toss out the high-fat fad diets such as the Zone or Atkins–these are absolutely the wrong diet strategies for a serious athlete!
An active male desirous of some weight loss might restrict his total dietary intake to around 2,000 calories per day (up to 50 percent more on extremely active days). This would break down to about 320 grams of carbohydrate, 80 grams of protein, and 45 grams of fat. Similarly, an active female wanting to drop a few pounds should limit total daily food consumption to about 1,500 calories (up to 30 percent more on extremely active days), striving for a macronutrient breakdown of around 240 grams of carbohydrate, 60 grams of protein, and 35 grams of fat. Upon achieving desired climbing weight, gradually increase caloric intake to determine the appropriate consumption to maintain a stable body weight. (Visit our online Calorie Calculator to estimate your needs and burn rate.)
Regarding aerobic exercise, running is by far the most effective method of incinerating fat and shrinking unwanted muscle. Don’t worry about losing your climbing muscles, however; they will be preserved as long as you continue to climb regularly and consume at least 1 gram of protein per kilogram of body weight per day. Other popular aerobic activities such as steep mountain biking and the StairMaster will yield mixed results: They do eat up body fat, but they may maintain (or build) undesirable leg muscle. Swimming or fast hiking are good alternatives, if you can’t run.
Frequency of aerobic training should be proportional to the magnitude of your weight loss goal. For example, if you are significantly overweight, then daily twenty- to forty-minute runs are an important part of your training-for-climbing program. As you near ideal weight, two or three twenty-minute runs per week are sufficient. Upon reaching your optimal weight, less aerobic training is necessary since sport climbing requires only modest aerobic fitness (although big wall and alpine climbers can certainly benefit from regular aerobic training). At this point, your training time is better invested on actual climbing and supplemental sport-specific exercises.
Recommended books:
1. Tourism Principles and Practice.5th Edition John Fletcher, Alan Fyall, David Gilbert, Stephen Wanhill Jun 2013
2. Introduction to Hospitality: Pearson New International Edition 06th Edition John Walker Aug 2013
3. Thinking through Tourism By Julie ScottBerg, 2010
4. The Business of Tourism 9th Edition Chris Holloway, Claire Humphreys Jun 2012
5. Research Methods for Leisure and Tourism 4th Edition A.J. Veal Mar 2011
6. Essentials of Tourism Chris Cooper Sep 2011
7. Research Methods for Arts and Event Management A.J. Veal, Christine Burton Aug 2014
№9 General characteristics of the equipment for active types of tourism
Aim of lecture: Give explanations for equipments in tourism activities
Key words: harness, carabiner, Kevlar rope
Plan of lecture:
Climbing ropes are typically of kernmantle construction, consisting of a core (kern) of long twisted fibres and an outer sheath (mantle) of woven coloured fibres. The core provides about 80% of the tensile strength, while the sheath is a durable layer that protects the core and gives the rope desirable handling characteristics.
Ropes used for climbing can be divided into two classes: dynamic ropes and low elongation ropes (sometimes called "static" ropes). Dynamic ropes are designed to absorb the energy of a falling climber, and are usually used as Belaying ropes. When a climber falls, the rope stretches, reducing the maximum force experienced by the climber, their belayer, and equipment. Low elongation ropes stretch much less, and are usually used in anchoring systems. They are also used for abseiling (rappelling) and as fixed ropesclimbed with ascenders.
Modern webbing or "tape" is made of nylon or Spectra/Dyneema, or a combination of the two. Climbing-specific nylon webbing is generally tubular webbing, that is, it is a tube of nylon pressed flat. It is very strong, generally rated in excess of 9 kN, or about 2,020 pounds of force. Dyneema is even stronger, often rated above 20 kN (about 4,500 lbf or 2000 kg) and as high as 27 kN (about 6,070 lbf or 2700 kg).[citation needed] In 2010, UK-based DMM performed fall factor 1 and 2 tests on various Dyneema and Nylon webbings, showing Dyneema slings can fail even under 60 cm falls. Tying knots in Dyneema webbing was proven to have reduced the total amount of supported force by as much as half.[2]
When webbing is sewn or tied together at the ends, it becomes a sling or runner, and if you clip a carabiner to each end of the sling, you have a quickdraw. These loops are made one of two ways—sewn (using reinforced stitching) or tied. Both ways of forming runners have advantages and drawbacks, and it is for the individual climber to choose which to use. Generally speaking, most climbers carry a few of both types. It is also important to note that only nylon can be safely knotted into a runner (usually using a water knot or beer knot), Dyneema is always sewn because the fibers are too slippery to hold a knot under weight.
Webbing has many uses such as:
Extending the distance between protection and a tie-in point.
An anchor around a tree or rock.
An anchor extension or equalization.
Makeshift harnesses.
Carrying equipment (clipped to a sling worn over the shoulder).
Protecting a rope that hangs over a sharp edge (tubular webbing).
Carabiners
Main article:Carabiner
Carabiners are metal loops with spring-loaded gates (openings), used as connectors. Once made primarily from steel, almost all carabiners for recreational climbing are made from a light weight aluminum alloy. Steel carabiners are much heavier, but harder wearing, and therefore are often used by instructors when working with groups.
Carabiners exist in various forms; the shape of the carabiner and the type of gate varies according to the use for which it is intended. There are two major varieties: locking and non-locking carabiners. Locking carabiners offer a method of preventing the gate from opening when in use. Locking carabiners are used for important connections, such as at the anchor point or a belay device. There are several different types of locking carabiners, including a twist-lock and a thread-lock. Twist-lock carabiners are commonly referred to as "auto-locking carabiners" due to their spring-loaded locking mechanism. Non-locking carabiners are commonly found as a component of quickdraws.
Carabiners are made with many different types of gates including wire-gate, bent-gate, and straight-gate. The different gates have different strengths and uses. Most locking carabiners utilize a straight-gate. Bent-gate and wire-gate carabiners are usually found on the rope-end of quickdraws, as they facilitate easier rope clipping than straight-gate carabiners.
Carabiners are also known by many slang names including biner (pronounced beaner) or Krab.
First climber who used a carabiner for climbing was German climber Otto Herzog.
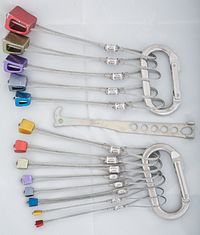
Quickdraws

Main article:Quickdraw
Quickdraws (often referred to as "draws") are used by climbers to connect ropes to bolt anchors, or to other traditional protection, allowing the rope to move through the anchoring system with minimal friction. A quickdraw consists of two non-locking carabiners connected together by a short, pre-sewn loop of webbing. Alternatively, and quite regularly, the pre-sewn webbing is replaced by a sling of the above-mentioned dyneema/nylon webbing. This is usually of a 60 cm loop and can be tripled over between the carabiners to form a 20 cm loop. Then when more length is needed the sling can be turned back into a 60 cm loop offering more versatility than a pre-sewn loop. Carabiners used for clipping into the protection generally have a straight gate, decreasing the possibility of the carabiner accidentally unclipping from the protection. The carabiner into which the rope is clipped often has a bent gate, so that clipping the rope into this carabiner can be done quickly and easily. Quickdraws are also frequently used in indoor lead climbing. The quickdraw may be pre-attached to the wall. When a climber ascends the wall, (s)he must clip the rope through the quickdraw in order to maintain safety. The safest, easiest and most effective place to clip into a quickdraw is when it is at waist height.
Harnesses
Main article:Climbing harness
A harness is a system used for connecting the rope to the climber. There are two loops at the front of the harness where the climber ties into the rope at the working end using a figure-eight knot. Most harnesses used in climbing are preconstructed and are worn around the pelvis and hips, although other types are used occasionally.
Different types of climbing warrant particular features for harnesses. Sport climbers typically use minimalistic harnesses, some with sewn-on gear loops. Alpine climbers often choose lightweight harnesses, perhaps with detachable leg loops. Big Wall climbers generally prefer padded waist belts and leg loops. There are also full body harnesses for children, whose pelvises may be too narrow to support a standard harness safely. These harnesses prevent children from falling even when inverted, and are either manufactured for children or constructed out of webbing. Some climbers use full body harnesses when there is a chance of inverting, or when carrying a heavy bag. There are also chest harnesses, which are used only in combination with a sit harness; this combination provides the same advantages as a full body harness. However, test results from UIAA show that chest harnesses can put more impact on the neck than sit harnesses, making them slightly more dangerous to use.
Apart from these harnesses, there are also caving and canyoning harnesses, which all serve different purposes. For example, a caving harness is made of tough waterproof and unpadded material, with dual attachment points. Releasing the maillon from these attachment points loosens the harness quickly.
Canyoning harnesses are somewhat like climbing harnesses, often without the padding, but with a seat protector, making it more comfortable to rappel. These usually have a single attachment point of Dyneema.
Belay devices
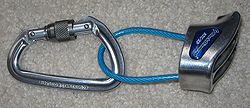
ATC-XP on locking carabiner
Main article:Belay devices
Belay devices are mechanical friction brake devices used to control a rope when belaying. Their main purpose is to allow the rope to be locked off with minimal effort to arrest a climber's fall. Multiple kinds of belay devices exist, some of which may additionally be used as descenders for controlled descent on a rope, as in abseiling or rappelling.
Belay devices are available in both passive and active designs:
Passive belay devices rely on the belayer's brake hand and a carabiner to lock off the rope. Sticht plates and the Air Traffic Controller (ATC) line of belay devices by Black Diamond Equipment are examples of passive belay devices. If a belay device is lost or damaged, a Munter hitch on a carabiner can be used as an improvised passive belay device.
Active belay devices have a built-in mechanism that locks off the rope without the help of any other pieces of equipment. The GriGri by Petzl is an example of an active belay device. The offset cam in the GriGri locks off the rope automatically to catch a falling climber, much like a seat belt in a car locks off to hold a passenger securely.
However, the GriGri's automatic action can lead to less alert belayers. The GriGri is not a hands-free belay device and constant vigilance is required by the belayer no matter what kind of device is used. One common mistake with the GriGri is reverse threading it, rendering the camming action useless.[3] Though, in a fall with a reverse threaded GriGri, bending the rope sharply under the GriGri provides more than enough friction to hold a falling climber as long as the belayer locks off the rope as they would with a tube style (passive) device.[citation needed]
It's important to note that in the event of a fall, automatic belay devices place more force on the anchors so are better suited for sports/indoor climbing. Most only work with thick single ropes, and they are not as versatile as other devices.[4]
An example of traditional belay is the Body Belay or the Hip Belay, where the rope is wrapped around the body to provide enough friction to catch a climber. This is often used in Alpine climbing where efficiency is important.[
Rappel devices (descenders)[
These devices are friction brakes which are designed for descending ropes. Many belay devices can be used as descenders, but there are descenders that are not practical for belaying, since it is too difficult to feed rope through them, or because they do not provide sufficient friction to hold a hard fall.
Figure eight
Sometimes called "figure of eight" or just "eight", this device is most commonly used as a descender, but may also be used as a belay device in the absence of more appropriate equipment.
It is an aluminum or steel "8" shaped device, but comes in several varieties. Its main advantage is efficient heat dissipation. A square eight, used in rescue applications, is better for rappelling than the traditional 8.

A figure eight descender
Figure eights allow fast but controlled descent on a rope. They are easy to set up and are effective in dissipating the heat caused by friction but can have a tendency to cause a rope to twist. Holding the brake hand off to the side twists the rope, whereas holding the brake hand straight down, parallel to the body, allows a controlled descent without twisting the rope. An 8 descender can wear a rope more quickly than a tube style belay/rappel device because of the many bends it puts into the rope. Many sport climbers also avoid them because of the extra bulk a Figure 8 puts on the climbing rack. However, many ice climbers prefer to use the 8, because it is much easier to thread with stiff or frozen rope.
Rescue eight
A rescue eight is a variation of a figure eight, with "ears" or "wings" which prevent the rope from "locking up" or creating a larks head or girth hitch, thus stranding the rappeller on the rope. Rescue eights are frequently made of steel, rather than aluminum.
Petzl Pirana
The Petzl Pirana is a slight variation to the traditional Figure 8 rappel device. The Pirana consists of a single loop of metal with double prongs jutting out of the bottom. Designed primarily for canyoneering, the Pirana allows for a variety of friction modes and, therefore, lowering speeds.[5] The Pirana supports three different braking positions, each supplying a different amount of friction, thereby changing the lowering speed. In contrast to the Figure 8, the Pirana can be loaded or disconnected from the rope without having to be removed from the carabiner.
For comfort, the Pirana can be extended away from the climber with nylon webbing or with a number of locking carabiners.
Rappel Rack
This consists of a 'U' shaped frame, attached to the rappeller's harness, into which snap multiple bars that pivot from the other side of the frame. The rope is woven through as many of the bars as are required to provide sufficient friction. This arrangement allows for variations in rope diameter and condition, as well as controlled rate of descent. Racks are seldom used in sport climbing. Cavers often use racks on long rappels because friction can be adjusted by adding or removing bars.
AscendersMain article:Ascender (climbing)
Ascenders are mechanical devices for ascending on a rope. They are also called Jumars, after a popular brand.
Jumars perform the same functionality as friction knots but less effort is needed to use them. A Jumar employs a cam which allows the device to slide freely in one direction but tightly grip the rope when pulled on in the opposite direction. To prevent a jumar from accidentally coming off the rope, a locking carabiner is used. The Jumar is first attached to the climber's harness by a piece of webbing or sling, and then the Jumar is clipped onto the rope and locked. Two ascenders are normally used to climb a fixed rope. For climbing a fixed rope attached to snow anchors on a steep slope, only one Jumar is used as the other hand is used for holding the ice axe.
Another type of ascender allows rope to feed in either direction, slowly, but locks up when pulled quickly. Such self-locking devices allow people to protect solo climbs because the amount of rope is automatically adjusted.
Slings[ edit ]
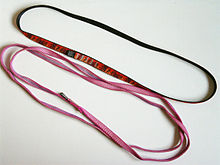
Slings
Main article:Sling (climbing equipment)
A sling or runner is an item of climbing equipment consisting of a tied or sewn loop of webbing that can be wrapped around sections of rock, hitched (tied) to other pieces of equipment or even tied directly to a tensioned line using a prusik knot, for anchor extension (to reduce rope drag and for other purposes), equalisation, or climbing the rope.
Daisy chain[ edit ]

A daisy chain
A daisy chain is a strap, several feet long and typically constructed from one-inch tubular nylon webbing of the same type used in lengthening straps between anchor-points and the main rope. The webbing is bar tacked at roughly two-inch intervals (or, in the past, tied) to create a length of small loops for attachment. Unlike the use of similar devices in backpacking, daisy chains in technical rock climbing are expected to be of sufficient strength to be "load bearing,". Daisy chain pockets however are not rated to full strength, and can only take static loads.
When clipped in, daisy chains should not be shortened by clipping in another pocket to the same carabiner. Failure of the pocket stitching results in the daisy chain disconnecting from the anchor, with potentially fatal consequences. If shortening the daisy chain when clipped in, in order to eliminate dangerous slack, a second carabiner should be used to connect to the anchor.[7]
Though daisy chains are sometimes used by free climbers as a type of sling (a quick attachment used from harness directly to a belay anchor), and for ad hoc purposes similar to those of the backpacker, the canonical use for a daisy chain is in aid climbing, wherein the leader will typically attach one end to the harness, and the other to the top-most anchor placement (by carabiner or fifi hook), particularly after having ascended in étriers as high as possible. This allows the leader to hang from the daisy chain while preparing the next anchor placement. The closely spaced loops allow fine-tuning the length from harness to anchor, thereby allowing the best possible reach for the next placement.
Daisy chains should not be confused with étriers, also known as aiders, which are short ladders made in the same way, but with larger loops, also used in aid climbing, nor with load-limiting devices often known as screamers (from their first trade name) designed to simulate a dynamic belay.
Protection devices
Protection devices, collectively known as rock protection or pro, provide the means to place temporary anchor points on the rock. These devices may be categorized as passive (e.g., nuts) or active (e.g., SLCDs). Passive protection acts "merely" as a choke when pulled on, and constrictions in the rock prevent it from pulling out. Active protection transforms a pull on the device into an outward pressure on the rock that helps the device set more firmly. The type of protection that is most appropriate varies depending on the nature of the rock.
Nuts
Main article:Nut (climbing)
Typical nuts and a nut tool

Black Diamond Hexcentrics
Nuts are manufactured in many different varieties. In their simplest form, they are just a small block of metal attached to a loop of cord or wire. They are used by simply wedging them into narrowing cracks in the rock, then giving them a tug to set them. Nuts are sometimes referred to by the slang term, wires.
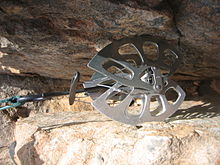
Hexes
Main article:hexes (climbing)
Hexes are the oldest form of active protection. They consist of a hollow eccentric hexagonal prism with tapered ends, usually threaded with cord or webbing. They are frequently placed as a passive chock, but are more commonly placed in active camming positions. In the standard active placement, a fall causes the hex to twist in its placement exerting sideways force on the rock in which it is placed. They are manufactured by several firms, with a range of sizes varying from about 10mm thick to 100mm wide. Sides may be straight or curved.
Spring-loaded camming devices
An SLCD placed in a crack.
Main article:Spring-loaded camming device
These consist of three or four cams mounted on a common axle or two adjacent axles, in such a way that pulling on the shaft connected to the axle forces the cams to spread further apart. The SLCD is used like a syringe, by pulling the cams via a "trigger" (a small handle) which forces them closer, inserting it into a crack or pocket in the rock, and then releasing the trigger. The springs make the cams expand and grip the rock face securely. A climbing rope may then be attached to the end of the stem via a sling andcarabiner. SLCDs are typically designed to maintain a constant camming angle with the rock to ensure that the normal force provided by the cam lobes against the rock face will supply enough friction to hold a cam in equilibrium with the rock.[8]
Tricams[
Main article:Tricam
A Tricam is a device that can be used as either active or passive protection. It consists of a shaped aluminium block attached to a length of tape (webbing). The block is shaped so that pulling on the tape makes it cam against the crack, gripping the rock tighter. Careful placement is necessary so that the "cam" does not loosen when not loaded. It is generally not as easy to place or remove as a SLCD but is much cheaper and lighter, and often is the only thing that will work in situations like quarry drill-holes and limestone pockets. The smaller sizes can work well in old piton scars, and can also be used passively as nuts.
Training equipment
Various items of equipment are employed during climbing-specific training.
Grip savers
A small device that can help in developing the antagonist muscles to those used while gripping with the hand. Use of such a device can prevent the ligament injuries that are frequently experienced by climbers.[citation needed]
Fingerboards
A wooden or resin apparatus chiefly used for improving grip strength and practicing grip techniques. They generally consist of a variety of different-sized pockets and ridges that one may hang from, or upon whichpull-ups can be performed. These pockets and ridges can range from large jug holds, to two-finger crimps. As well as exercising the arm, fingerboards can greatly improve finger strength, thus the name. When used effectively they can facilitate huge gains in forearm strength and lock off strength, mostly in the flexor digitorum profundus and flexor digitorum superficialis muscles of the fore arms. They are also an apparatus with the capability to injure the user, usually in the A1-4 pulleys or along sections of flexor carpi sheath linking the different FDS or FDP sections in the forearm.
Fingerboards are usually mounted above a doorway, or anywhere that allows the user's body to hang freely, one of the best available attachment areas is to roof beams. They are also called hangboards.
Campus boards
Main article:Campus board
A series of horizontal rungs attached to an overhanging surface that may be climbed up and down without the aid of the feet. When used properly, campus boards can improve finger strength and so-called "contact strength".
Bachar ladder
Main article:Bachar ladder
A bachar ladder is made by stringing large diameter PVC piping on webbing and is climbed without using the feet. It can help improve overall upper body strength as well as core strength.
Specialized clothing
In the early days of climbing, many would have considered specialised clothing to be cheating. In fact, the first climbers considered an untucked shirt or unbuttoned sport jacket a sign of weakness. Several climbers even chose to climb barefoot, an act that modern climbers would find amazing. In the 1980s and early 1990s, the trend was to wear tight, brightly coloured clothes often made from Spandex. The trend, now, is to wear looser-fitting clothing. Trousers can be tailored to prevent them from restricting movement by adding features such as articulated knee joints and diamond crotch.
Helmet[ edit ]

A Petzl Elios climbing helmet designed for caving and mountaineering
The climbing helmet is a piece of safety equipment that primarily protects the skull against falling debris (such as rocks or dropped pieces of protection) and impact forces during a fall. For example, if a lead climber allows the rope to wrap behind an ankle, a fall can flip the climber over and consequently impact the back of the head. Furthermore, any effects of pendulum from a fall that have not been compensated for by the belayer may also result in head injury to the climber. The risk of head injury to a falling climber can be further significantly mitigated by falling correctly.
Climbers may decide whether to wear a helmet based on a number of factors such as the type of climb being attempted, concerns about weight, reductions in agility, added encumbrances, or simple vanity. Additionally, there is less incentive to wear a helmet in artificial climbing environments like indoor climbing walls (where routes and holds are regularly maintained) than on natural multi-pitch routes or ice climbing routes (where falling rocks and/or ice are likely).
Climbing shoes
Main article:Climbing shoe
Specifically designed foot wear is usually worn for climbing. To increase the grip of the foot on a climbing wall or rock face due to friction, the shoe is soled with a vulcanized rubber layer. Usually, shoes are only a few millimetres thick and fit very snugly around the foot. Stiffer shoes are used for "edging", more compliant ones for "smearing". Some have foam padding on the heel to make descents and rappels more comfortable. Climbing shoes can be re-soled which decreases the frequency that shoes need to be replaced.
Belay gloves
A belay glove is a glove constructed from either leather or a synthetic substitute, is used to protect the hands when belaying, and is especially useful if using a classic or body belay. They are also very useful for controlling the belay with single, lead ropes that are 9.5mm or smaller.[9] Ultimately, belay gloves can lessen the possibility of rope burn and the subsequent involuntary release of the rope.
Miscellaneous equipment
Tape
Medical tape is useful to both prevent and repair minor injuries. For example, tape is often used to fix flappers. Many climbers use tape to bind fingers or wrists to prevent recurring tendon problems. Tape is also highly desirable for protecting hands on climbing routes that consist mostly of repeated hand jamming.
"Tape" can also refer to nylon webbing.
Haul bag
A haul bag refers to a large, tough, and often unwieldy bag into which supplies and climbing equipment can be thrown. A rucksack or day pack often has a webbing, haul loop on the top edge.
Haul bags are often affectionately known as "pigs" due to their unwieldy nature.
Gear sling
A gear sling is usually used by trad (traditional), or big wall climbers when they have too much gear to fit onto the gear loops of their harnesses. The simplest forms are homemade slings of webbing; more elaborate forms are padded.
Chalk
Chalk is used by nearly all climbers to absorb problematic moisture, often sweat, on the hands. Typically, chalk is stored as a loose powder in a special chalk bag designed to prevent spillage, most often closed with a drawstring. This chalk bag is then hung by a carabiner from the climbing harness or from a simple belt worn around the climber's waist. This allows the climber to re-chalk during the climb with minimal interruption or effort. To prevent excess chalking (which can actually decrease friction), some climbers will store their chalk in a chalk ball, which is then kept in the chalk bag. A chalk ball is a very fine, mesh sack that allows chalk release with minimum leakage when squeezed so that the climber can control the amount of chalk on the hands.
Chalk is most frequently white, and the repeated use of holds by freshly-chalked hands leads to chalky build-up. While this isn't a concern in an indoor gym setting, white chalk build-up on the natural rock of outdoor climbs is considered to be an eyesore at best, and many consider it a legitimate environmental/conservation concern. In the United States, the Bureau of Land Management advocates the use of chalk that matches the color of the native rock.[10] Several popular climbing areas, like Arches National Park have banned white chalk, instead allowing the use of rock-colored chalk. Garden of the Gods has gone further, banning the use of calcium carbonate (the most common chalk) outright, requiring the use of a rock-colored substitute. A handful of companies make colored chalk or a chalk substitute designed to comply with these environmental conservation measures.
№ 10 Techniques of sport tourism.
Aim of lecture:. To familiarize students with the techniques of sports tourism
|
|
|
