 |


Particles. Shaders. Shader Graph. Best Practices. Collision Handling. Lighting. Light Probes. ○ Texture Sheet Animation Module
|
|
|
|
Particles
● Videos:
○ Everything to know about the PARTICLE SYSTEM - YouTube
○ Visual Effects With Particle Systems - Overview and Goals [1/8] Live 2017/1/23 - - YouTube
● Animated Particles
○ Texture Sheet Animation Module
○ https: //www. udemy. com/unitycourse/learn/lecture/11603030#questions
● 2D Particles
● 3D Particles
Shaders
● Videos: Makin' Stuff Look Good - YouTube
○ A fantastic series of videos which walk through how to achieve visual effects from popular video games
Shader Graph
● Videos: Best practices for Shader Graph - Unite LA - YouTube
3D
Best Practices
● Instances in Unity are “looking towards” the Z-Axis
● Vector calculation between 2 instances:
○ Direction (Vector3): direction = (player. transform. position - transform. position). normalized;
○ Distance (float): distanceToTarget = Vector3. Distance(target. position, transform. position);
Raycasting:
● Out-put your result: Store the results of the Raycast in a variable which is “output” as part of the Method call (declare a variable of type RaycastHit)
● Did I hit anything?: Perform a check on “hit. transform” to see if there is any valid transform
● Point of Collision: Instantiate instances at the point of ray collision by using “hit. point”
● Raycast orientation: Use Quaternion. LookRotation(hit. normal) for the orientation of the raycast relative to its origin
● Weapon Shooting Sample Code: 
public float range = 200f;
public float damage = 25f;
public ParticleSystem muzzleFlare;
public GameObject bulletHitPrefab;
private Camera camera;
private bool myBool;
void Start() {
camera = Camera. main;
}
void Update() {
if (Input. GetMouseButtonDown(0)) {
muzzleFlare. Play();
Physics. Raycast(camera. transform. position, camera. transform. forward, out RaycastHit hit, range);
if (hit. transform) {
//Try to get IShootable
IShootable shootable = hit. transform. gameObject. GetComponent< IShootable> ();
if (shootable == null) {
Destroy(Instantiate(bulletHitPrefab, hit. point, Quaternion. LookRotation(hit. normal)), 0. 05f);
} else {
shootable. OnHit(this);
}
}
}
}
Collision Handling
● Set “isTrigger”: Collisions occur between one instance and another which has its collider flagged as “isTrigger”
○ MAKE SURE BOTH OBJECTS HAVE RIGIDBODY COMPONENTS
● Get what you're looking for: Check for Components using the Collider’s gameObject with “GetComponent< T> ” then check if the result was not null
|
|
|

● Collecting ammo Sample Code:
private void OnTriggerEnter(Collider other) {
var foundComponent = other. gameObject. GetComponent< AmmoPickup> ();
if (foundComponent) {
ammo += foundComponent. Collect();
}
}
3D Tilemap:
● Swizzle: By adjusting the “Swizzle” of a Grid Component, a grid can be used in 3D space on a flat plane instead of the default vertical X / Y grid.
○ Change the “Cell Swizzle” from XYZ to XZY
○ On the Tilemap: change the “Orientation” from XY to XZ
https: //www. youtube. com/watch? v=UqhK6GpCgrM
Lighting
Light Probes
● Reference: HIGH QUALITY LIGHTING using Light Probes - Unity Tutorial - YouTube
○ Summary: Light Probes offer improved performance by baking lighting information into a small number of discrete “probes” which dynamic objects in the scene will use as a reference for how they should be lit
■ Mark Static Objects: Mark all non-moving entities as “Static”
■ Mixed Source: Set Lighting Source to Mixed
■ Create Light Probe Group
■ Place Probes: Move / add probe positions to place them on either side of a change in lighting (on either side of a cast shadow or change in material)
■ Debug: If you encounter issues, turn off automatic light baking and bake lightmaps manually (you may wish to do this anyways for performance)
2D
Best Practices
Sprite Import Settings;
● Pixels Per Unit: Specifies the density of pixels relative to a Unity Unit:
○ Sprite. pixelsPerUnit: Get ppu in script
○ https: //docs. unity3d. com/ScriptReference/Sprite-pixelsPerUnit. html
● 2D Pixel Perfect: How to set up your Unity project for retro 8-bit games: https: //blogs. unity3d. com/2019/03/13/2d-pixel-perfect-how-to-set-up-your-unity-project-for-retro-8-bits-games/
○ On the Sprite itself:
■ Filter mode changed to ‘Point’
■ Compression changed to ‘None
■ Ensure the Spritesheet is smaller than the Max Size property
○ In the Sprite Editor: Set the pivot unit mode to ‘Pixels’ instead of ‘Normalized’
○ The Pixel-Perfect Camera Component:
■ Install the 2D Pixel Perfect package through the Package Manager
■ Check ‘Run In Edit Mode’ and set the display aspect ratio in the Game view to ‘Free Aspect’. The component will display helpful messages in the game view explaining if the display is not pixel-perfect at any given resolution
■ Assets Pixels Per Unit: This should match the Pixels-Per-Unit assigned to each Sprite in the game
■ Reference Resolution: For truly retro-games, set a very small resolution such as 320x180
■ Upscale Render Texture: This takes the small reference resolution set above and scales it to fill the entire screen.
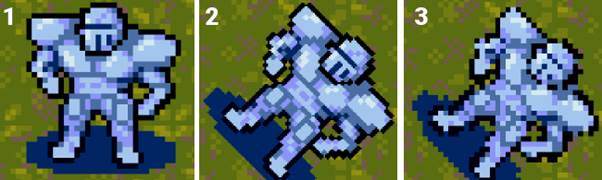
1. Original (not rotated) 2. Without Upscale Render Texture (rotated 45 degrees, pixel-perfectness is lost as pixel size varies on diagonal edges) 3. With Upscale Render Texture (rotated 45 degrees, pixel-perfectness is maintained as all pixels are the same size, but the sprite is less accurate looking compared to the original. )
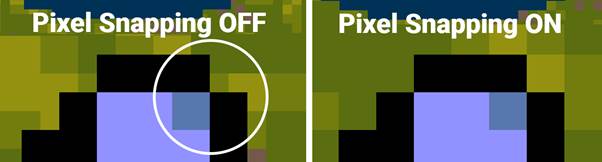
■ Pixel Snapping: Forces images to be rendered snapped to the nearest grid position. This can be left off for smoothness.
|
|
|
■ Crop Frame (X / Y): This crops the viewed region of worldspace to exactly match the reference resolution, and adds black margins to the display to fill the gaps at the edges of the screen.
■ Stretch Fill: Stretches the image to fill the chosen aspect ratio if BOTH X & Y Crop Frame are selected, but can result in a blurry image; best to leave off and use only Crop Frame X or Y if not using Upscale Render Texture
● Rotating a 2D Asset: Use Quaternion. Euler applied to the rotation property of a RectTransform, then modify the z component of the Vector.
image. rotation = Quaternion. Euler(new Vector3(0f, 0f, image. rotation. eulerAngles. z + addRotation));
○ Get the current Rotation: image. rotation. eulerAngles. z
● Mouse Position in Screen Space:
○ In an Orthographic Camera, to convert from Screen space to World space coordinates, you can use the following code:
Vector2 mousePosition = Camera. main. ScreenToWorldPoint(Input. mousePosition);
■ DEFINITELY cache the camera to avoid using Camera. main
○ For games where the resolution does not match, the following script can be used:
destinationPosition = new Vector2((Input. mousePosition. x / Screen. width)*GC. vWidth, (Input. mousePosition. y / Screen. height)*GC. vHeight);
■ GC. vWdith / Height are constants with the actual screen dimensions
● Distance between 2 points: Takes in 2 Vector2 positions and returns a float with the length between those points in Unity Units:
float distance = Vector2. Distance(transform. position, mousePosition);
● Angle between 2 Points: Returns a float which can be directly assigned to a Unity Euler angle.
public float Direction(Vector2 _a, Vector2 _b) {
return Mathf. Rad2Deg*Mathf. Atan2(_a. y - _b. y, _a. x - _b. x);
}
○ Mathf. Atan2 performs the calculation on (y2 - y1 / x2 - x1), and returns the inverse tangent in a range between 0 - 360 degrees (as opposed to 0 - 90 range per quadrant)
○ Mathf. Rad2Deg turns the result into a degree value so it can be assigned to a transform rotation
○ Direction from self to Mouse: Uses the above Method, but supplies the transformation on the mouse’s current position in screen space:
public float DirectionToMouse() {
return Direction(Camera. main. ScreenToWorldPoint( Input. mousePosition), transform. position);
}
○ Camera. main. ScreenToWorldPoint turns the mouse’s position in the view into screen-space coordinates which the Direction method can then translate into a simple angle measure.
○ In theory, this should work too: But it doesn’t, and it’s more complicated.
Vector2 mousePosition = Camera. main. ScreenToWorldPoint(Input. mousePosition);
Vector2 vectorToMouse = new Vector2(transform. position. x - mousePosition. x, transform. position. y - mousePosition. y);
float angle = Vector2. SignedAngle(transform. position, vectorToMouse) + 15f; //WHY??
○ mousePosition holds a reference to the mouse position in screen space
○ vectorToMouse subtracts the vectors from one another to give us a direction from our transform. position to the mouse’s position
○ angle uses Vector2. SignedAngle to get the angle measure between the two supplied vectors but for SOME REASON, always seems to be short by 15 degrees, hence the addition at the end of the line.
○ Also, this ISN’T EVEN ACCURATE, it has a degree of error around 0 (off by +1 degree) which becomes less as the angle approaches 360 degrees
● Texture Scrolling:
○ https: //www. udemy. com/unitycourse/learn/lecture/11591246#questions
|
|
|
